
Recipe: “BLOW YOUR MIND” Healthy, No-Strain Tomato Basil Pasta!
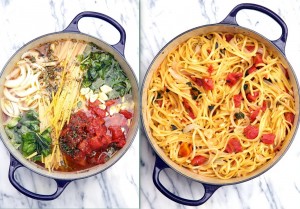
I’ve seen this recipe floating around my Facebook page for a while, but I couldn’t ignore it anymore. It’s amazing! You just add all the ingredients into one big pot, stir and simmer until it’s fully cooked. No straining, no waste, and only takes FIFTEEN MINUTES! It’s called “Summer Pasta” because it doesn’t take a lot of work to make, but it absolutely could be made year-round (and should because it’s so healthy!). Here’s the great recipe from MyFridgeFood (check the link for calories and in the comments section for what others added for recipe ideas).
Ingredients:
- 12 oz pasta
- 1 can (15 oz) diced tomatos with liquid (You can use fresh if you would rather)
- 1 large sweet onion, cut in julienne strips
- 4 cloves garlic, thinly sliced
- 1/2 teaspoon red pepper flakes
- 2 teaspoons dried oregano leaves
- 2 large sprigs basil, chopped
- 4 1/2 cups vegetable broth (regular broth and NOT low sodium)
- 2 tablespoons extra virgin olive oil
- Parmesan cheese for garnish
Directions:
- Place pasta, tomatoes, onion, garlic, basil, in a large stock pot. Pour in vegetable broth. Sprinkle on top the pepper flakes and oregano. Drizzle top with oil.
- Cover pot and bring to a boil. Reduce to a low simmer and keep covered and cook for about 10 minutes, stirring every 2 minutes or so.
- Cook until almost all liquid has evaporated (an inch or less, as desired).
- Season to taste with salt and pepper, stirring pasta several times to distribute the liquid in the bottom of the pot.
- Serve garnished with parmesan cheese.
Recipe: DIY Turkey Cookie Pops
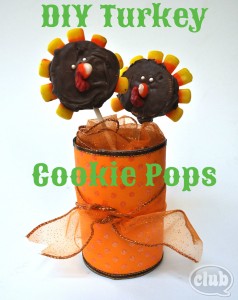
Here’s a simple and delicious “craft” from Chica Circle that you can do with the kids and give as gifts (or eat them yourselves!). Stop over at Chica Circle for the visual tutorial on these cookie pops, then also do the cute recycled aluminum can craft in the picture! Would be a great addition to the cookie pops to give as a gift!
Ingredients & What You’ll Need:
- chocolate (brown) and red candy melts
- candy corn
- popsicle sticks
- wax paper
- Oreo cookies (chocolate or vanilla)
- Candy pearls
Directions:
- Melt chocolate candy melts in a bowl for one minute and stir until smooth. Dip one end of lollipop stick in melted candy and stick in center of sandwich cookie.
- Place on wax paper and let cool in refrigerator for 5 minutes until hardened.
- Either dip cookie into melted candy or use a knife to spread on all sides of cookie. While chocolate is still soft, arrange 8 candy corn pieces along edge starting at the top on one side.
- Finish arranging all 8 candy corn pieces all the back of one side and place on wax paper, candy corn side down.
- For face, place one candy corn sticking up in center for beak. Place two candy pearl dots for eyes. Let harden in refrigerator again for 5 minutes.
- For the turkey’s wattle, place a few red candy melts into a small ziplock bag. Melt for about 20-30 seconds and squish in bag until smooth. Clip one end of bag and squeeze a tiny bit on one side of the candy corn. Let harden.
20+ Recipes for Homemade Flavored Coffee Creamer
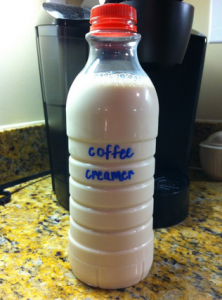
My hubby and I love coffee in the morning with that lovely and oh so expensive flavored coffee creamer. It is super expensive and it seems that prices are continuing to rise. You can make this for just over 1/2 the cost of those that you buy in the store. If you can grab the ingredients on sale, grab it for less than half the cost.
Ingredients for the Base:
- 14oz sweetened condensed milk
- 1 3/4 cup milk or cream (whole, lowfat, skim, almond, soy, heavy cream, half & half etc – whatever your preference, however the more fat, the more creaminess)
Then you need to choose which is your flavor choice. If the flavor your choose has an ingredant that is powdered (like cinnamon or cocoa) then heat about 1.2 cup of the base and disolve the power in that first…it helps so that your creamer is not grainy!
Choose Your Flavor
French Vanilla Creamer
- 2 teaspoons vanilla extract OR vanilla coffee syrup (most grocery stores have this now where they sell coffee or get it at Stabucks)
Vanilla Bean Coffee Creamer
- 2 teaspoons vanilla bean paste (vanilla extract will not work)
Chocolate
- 2-3 tablespoons chocolate syrup (any brand, I like Hershey’s)
- 1 tsp vanilla extract
Chocolate Almond
- 1 tablespoon cocoa powder
- 1 teaspoon almond extract
How to Cook Pumpkin Seeds
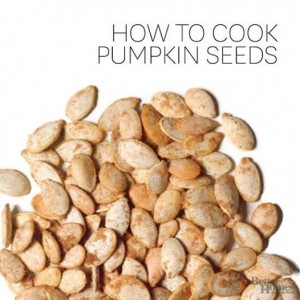
Most families like to save their pumpkin seeds from the pulp of their jack-o’-lanterns and allow them to dry. Then which recipe is the best for those pumpkin seeds? This 5-star rated recipe from Food.com is PERFECT and everyone will love it – simple, delicious, and traditional. Enjoy!
Ingredients (Makes 1 cup of seeds):
- 1 1/2 cups pumpkin seeds
- 2 teaspoons melted butter (olive oil or vegetable oil also work well) or 2 teaspoons melted oil (olive oil or vegetable oil also work well)
- salt
- garlic powder (optional)
- cayenne pepper (optional)
- seasoning salt (optional)
- cajun seasoning (optional)
Directions:
- Preheat oven to 300 degrees F.
- It’s okay to leave some strings and pulp on your seeds (it adds flavor), but be sure to clean off any big chunks.
- Toss pumpkin seeds in a bowl with the melted butter or oil and seasonings of your choice.
- Spread pumpkin seeds in a single layer on baking sheet.
- Bake for about 45 minutes, stirring occasionally, until golden brown.
Recipe: Pumpkin Bread Truffles

If you like the taste of pumpkin bread, then you will love these truffles from GHK! Decorate them like mini pumpkins to for a beautiful Fall dessert.
Ingredients:
- 9×5-in. (about 1 lb) loaf of cooled pumpkin bread (can be store bought or homemade)
- 1 cup (about 8.5 oz) cream cheese frosting
- 24 oz orange candy coating
- 2 Tbsp chocolate chips or chocolate candy coating
- 2 oz green candy coating
Directions:
- Break apart the pumpkin bread into small bits into a large bowl, then work gently between your fingers until it is in tiny crumbled pieces.
- Add the frosting to the pumpkin bread crumbs then stir together until well-combined and no streaks of frosting remain. The mixture should be moist and hold together if you squeeze it into a ball between your fingers. If it is too dry, add another spoonful of frosting to get it to the best consistency. Keep adding frosting until the mixture is at the right consistency.
- Use a small 1″ candy scoop or a spoon to scoop out small balls of the pumpkin bread mixture. Roll the dough between your palms until perfectly round, then place them on a parchment or waxed paper covered baking sheet.
- Stick the balls in the refrigerator and chill them for 2 to 3 hours or until firm.
- Put orange candy coating in a medium microwave-safe bowl and microwave until melted, stirring every 30 seconds to prevent overheating.
- Use dipping tools or a fork to dip a pumpkin bread truffle into the orange candy coating. Let the excess candy drip back into the bowl, then place the truffle back on the baking sheet. Repeat until all of the truffles are dipped.
- Melt the chocolate chips or chocolate candy coating in the microwave, then stir the melted chocolate into the remaining melted orange coating to make a deeper orange color. Transfer the dark orange coating to a paper cone, piping bag fitted with a small round tip, or a plastic bag with a small hole cut in the corner. Draw piping of intersecting lines across the top of the truffles to create pumpkin creases.
- Melt the green candy coating in a microwave-safe bowl, then transfer it to a paper cone, piping bag fitted with a small round tip, or a plastic bag with a small hole cut in the corner. Pipe curls of green coating on top of each pumpkin to look like vines.
- Refrigerate the truffles briefly to set the candy coating.
- For the best taste and texture, serve the Pumpkin Bread Truffles at room temperature, and store extra truffles in an airtight container in the refrigerator for up to 2 weeks.