
Recipe: DIY Turkey Cookie Pops
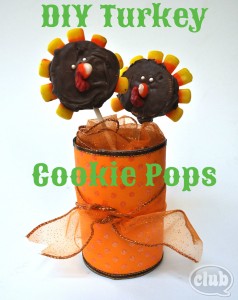
Here’s a simple and delicious “craft” from Chica Circle that you can do with the kids and give as gifts (or eat them yourselves!). Stop over at Chica Circle for the visual tutorial on these cookie pops, then also do the cute recycled aluminum can craft in the picture! Would be a great addition to the cookie pops to give as a gift!
Ingredients & What You’ll Need:
- chocolate (brown) and red candy melts
- candy corn
- popsicle sticks
- wax paper
- Oreo cookies (chocolate or vanilla)
- Candy pearls
Directions:
- Melt chocolate candy melts in a bowl for one minute and stir until smooth. Dip one end of lollipop stick in melted candy and stick in center of sandwich cookie.
- Place on wax paper and let cool in refrigerator for 5 minutes until hardened.
- Either dip cookie into melted candy or use a knife to spread on all sides of cookie. While chocolate is still soft, arrange 8 candy corn pieces along edge starting at the top on one side.
- Finish arranging all 8 candy corn pieces all the back of one side and place on wax paper, candy corn side down.
- For face, place one candy corn sticking up in center for beak. Place two candy pearl dots for eyes. Let harden in refrigerator again for 5 minutes.
- For the turkey’s wattle, place a few red candy melts into a small ziplock bag. Melt for about 20-30 seconds and squish in bag until smooth. Clip one end of bag and squeeze a tiny bit on one side of the candy corn. Let harden.
Recipe: Pumpkin Bread Truffles
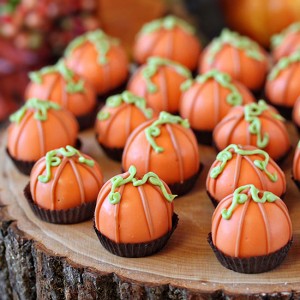
If you like the taste of pumpkin bread, then you will love these truffles from GHK! Decorate them like mini pumpkins to for a beautiful Fall dessert.
Ingredients:
- 9×5-in. (about 1 lb) loaf of cooled pumpkin bread (can be store bought or homemade)
- 1 cup (about 8.5 oz) cream cheese frosting
- 24 oz orange candy coating
- 2 Tbsp chocolate chips or chocolate candy coating
- 2 oz green candy coating
Directions:
- Break apart the pumpkin bread into small bits into a large bowl, then work gently between your fingers until it is in tiny crumbled pieces.
- Add the frosting to the pumpkin bread crumbs then stir together until well-combined and no streaks of frosting remain. The mixture should be moist and hold together if you squeeze it into a ball between your fingers. If it is too dry, add another spoonful of frosting to get it to the best consistency. Keep adding frosting until the mixture is at the right consistency.
- Use a small 1″ candy scoop or a spoon to scoop out small balls of the pumpkin bread mixture. Roll the dough between your palms until perfectly round, then place them on a parchment or waxed paper covered baking sheet.
- Stick the balls in the refrigerator and chill them for 2 to 3 hours or until firm.
- Put orange candy coating in a medium microwave-safe bowl and microwave until melted, stirring every 30 seconds to prevent overheating.
- Use dipping tools or a fork to dip a pumpkin bread truffle into the orange candy coating. Let the excess candy drip back into the bowl, then place the truffle back on the baking sheet. Repeat until all of the truffles are dipped.
- Melt the chocolate chips or chocolate candy coating in the microwave, then stir the melted chocolate into the remaining melted orange coating to make a deeper orange color. Transfer the dark orange coating to a paper cone, piping bag fitted with a small round tip, or a plastic bag with a small hole cut in the corner. Draw piping of intersecting lines across the top of the truffles to create pumpkin creases.
- Melt the green candy coating in a microwave-safe bowl, then transfer it to a paper cone, piping bag fitted with a small round tip, or a plastic bag with a small hole cut in the corner. Pipe curls of green coating on top of each pumpkin to look like vines.
- Refrigerate the truffles briefly to set the candy coating.
- For the best taste and texture, serve the Pumpkin Bread Truffles at room temperature, and store extra truffles in an airtight container in the refrigerator for up to 2 weeks.
Recipe: No-Bake Pumpkin Spice Cheesecake Enchiladas with Caramel Drizzle
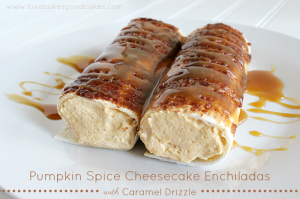
It’s Pumpkin Spice EVERYTHING time! I bet you never thought you’d see Pumpkin Spice Cheesecake Enchiladas!!! Well, here it is and it’s a fairly easy recipe, too. Thank you to Jamie at Love Bakes Good Cakes for this awesome recipe! Go over and tell her thank you from us. Also, check out her other pumpkin recipes. She has a ton!
Ingredients: (9-12 servings)
- 1 pkg (8 oz.) of cream cheese, softened
- 1 cup of canned pumpkin
- 1/2 cup of sugar
- 1/2 tsp of pumpkin pie spice
- 2½ cups pf Cool Whip, thawed
- 18-24 flour tortillas
- 6 tbsp of butter, melted
- 2 tsp of sugar
- 2 tsp of cinnamon
- Caramel sauce
Directions:
- In a large bowl, beat the cream cheese, pumpkin, sugar and pumpkin pie spice with an electric mixer on medium speed until well blended. Then gently stir in the whipped topping.
- Divide the cream cheese mixture evenly between the tortillas. Roll each tortilla up and put on serving plates.
- In a small bowl, combine the butter, sugar and cinnamon. Brush the mixture over the over the rolled tortillas.
- Top with caramel sauce, and either serve immediately, or cover and place in refrigerator until ready to serve. It’s that simple!
Recipe: Pumpkin Sheet Cake With Cream Cheese Frosting
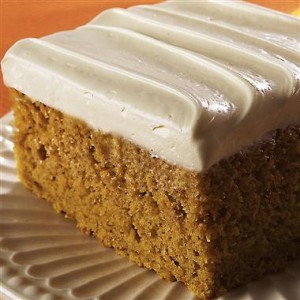
It’s that time of year again — PUMPKIN EVERYTHING!!! Instead of going to the store or bakery, you can make your own super easy pumpkin cake at home with a recipe from Eat at Home.
Ingredients & Directions for Pumpkin Cake:
- 16 oz can of pumpkin
- 2 cups of sugar
- 1 cup of vegetable oil
- 4 eggs, beaten
- 2 cups of flour
- 2 tsp of baking soda
- 2 tsp of cinnamon
- 1/4 tsp of nutmeg
- 1/2 tsp of salt
- Beat the pumpkin, sugar and oil in a medium mixing bowl. Then add eggs and mix well.
- Combine the dry ingredients and add to the pumpkin mixture, beating until well blended.
- Pour into a greased 10×15 inch baking pan.
- Bake for 25-35 minutes at 350 degrees.
- Cool the cake completely and then frost it with the cream cheese frosting.
Here’s what you’ll need for the frosting:
Ingredients & Directions For the Cream Cheese Frosting:
- 5 Tbs of butter, softened
- 3 oz of cream cheese, softened
- 1 tsp of vanilla
- 1-3/4 cups of powdered sugar
- 3-4 tsp of milk
- Optional: Chopped nuts or fall candies for the top
- Beat the butter and cream cheese together. Add the vanilla and blend till smooth.
- Gradually add the powdered sugar and mix well.
- Add the milk a bit at a time until you get it to a spreadable consistency.
- Spread gently and evenly over the cooled pumpkin cake.
- Optional: Add the nuts or candies to the top of the cake evenly or in a decorative fashion.
Recipe: “Stained Glass” Sugar Cookies

This is the coolest and most creative use of hard candies I’ve seen since the DIY Christmas platters using peppermint candies I posted back in December. They’re beautiful, fun to look at, easy to make, and completely, 100% edible! Make them for your next potluck, for holidays, or just for fun. I can’t wait to hear how you like them!
Ingredients & Tools:
- Jolly Ranchers Hard Candies (Any hard candy will work, but cannot be sugar-free candy)
- Your favorite sugar cookie recipe (either premade or made from scratch, both work)
- 2 sizes of cookie cutters (these were hearts, but you can use your choice of 2 of the same shape, but different sizes)
- Baking sheet
- Wire racks
- Waxed paper
Directions:
- Roll out sugar cookie dough and cut out the cookies with a large cookie cutter. Use a spatula to move them to the baking sheet.
- Using the small cookie cutter, remove the centers of the large cookies that are on the baking sheet.
- Place 2 Jolly Ranchers (or other hard candy) of different colors inside the new empty center of the cookies. Choosing 2 different colors gives the stained glass look.
- Bake cookies with candy centers according to your cookie recipe’s instructions.
- Let the cookies cool on the baking sheet for 5 minutes to allow the candy center to harden before you then transfer them to wire racks to cool completely.
- Once fully cooled, you can move them onto a plate or into a storage container, but to prevent the hard candies from sticking together place waxed paper between layers of cookies. Enjoy!