
DIY Chocolate Mint Body Butter
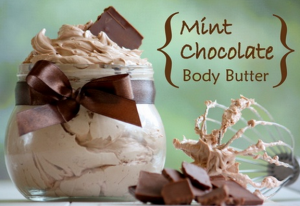
While on Pinterest the other day, I stumbled across this amazing recipe for a DIY Chocolate Mint Body Butter. I sounded like an amazing experiment I once got a container of this for a gift and know that it cost nearly $15 for a small container. This one is a little cheaper to make and you get so much more for your money. Plus you can make it with more organic/chemical free ingredients. The main recipe came from a website called mommypotamus.com. I also found another one (there was no credit on that one) and have sort of combined the two to get the best effect.
- 1/2 cup of cocoa butter (it’s listed as cacao butter sometimes.)
- 1/2 cup mango or shea butter (you can also substitute another 1/2 cup cocoa butter. It will be a little less “light” when whipped up, but it was really amazing…especially for dry skin.)
- 1/2 cup coconut oil
- 1/2 cup of jojoba or a mild olive oil. I used olive oil and that gave outstanding results and was my favorite.
- 1-2 teaspoons peppermint essential oil (the more you add the stronger the mint scent)
- 1 1/2 tablespoons pure cocoa powder (if you would prefer a “white chocolate” version that is not a bronzer, substitute arrowroot powder or non-GMO cornstarch)
- 2 teaspoons naturally derived vitamin E (optional). I pierced some vitamin E capsules and it worked well!
How To Make Whipped Body Butter:
- Prepare an ice bath by filling a large bowl with ice and fitting a smaller bowl inside. The inside bowl needs to be able to hold at least 4-5 cups of liquid. Glass works better than metal.
- Using a double boiler or a pot of boiling water with a smaller pot fitted inside, melt cocoa butter and mango butter over a low simmer. This will prevent it from scalding.
- Add coconut oil and melt until completely liquid.
- Remove cocoa butter/coconut oil mixture from heat.
- Measure 5 teaspoons of cocoa powder into a small bowl and gradually add several tablespoons of jojoba/almond/olive oil. Mix thoroughly and then add to cocoa butter/coconut oil mixture along with remaining jojoba/almond/olive oil.
- Place mixture in chilled bowl (which should still be resting above the ice bowl) and allow to cool for 10-20 minutes.
- Remove mixture from ice bath and whip very well until stiff peaks form. If after a few minutes it does not seem to be thickening return the bowl to the ice bath and whip there.
- Store in an airtight jar – Keep out of sunlight to prevent oxidation. I keep mine in the cupboard a.k.a cool dry place.
- You will also want to store it in a cool place. If your bathroom gets warm, it’s not the place to keep this.
Homemade Snickers Bars
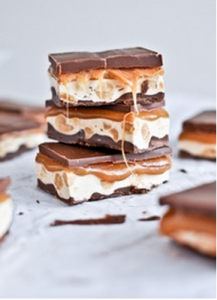
This might sound complicated but let me tell you, you will love them from the first bite till the last and will wish you had another one as soon as you finish! I am not big on candy making but these are to die for!
INGREDIENTS:
For the Bottom Chocolate Layer:
1¼ cups milk chocolate chips
¼ cup creamy peanut butter (any brand, must be creamy)
For the Nougat Layer:
4 tablespoons unsalted butter
1 cup granulated sugar
¼ cup evaporated milk
1½ cups marshmallow fluff
¼ cup creamy peanut butter
1½ cups salted peanuts, roughly chopped
1 teaspoon vanilla extract
For the Caramel Layer:
14 ounces caramels, unwrapped
¼ cup heavy cream (DO NOT USE HEAVY WHIPPING CREAM)
For the Top Chocolate Layer:
1¼ cups milk chocolate chips
¼ cup creamy peanut butter
DIRECTIONS:
1. Take and grease a 9×13-inch baking pan. Line with parchment paper, then grease the parchment paper too; set aside.
2. Make the Bottom Chocolate Layer. To do this melt the chocolate chips and peanut butter in the microwave on 50% power until completely smooth and melted. Make sure you are stirring every 30 seconds. Then pour into the prepared baking dish and then using a spatula, smooth into an even layer. Refrigerate until completely cool and hard, about 30 minutes no more than 45 minutes.
3. Make the Nougat Layer. Slowly melt the butter in a medium saucepan over medium heat. Then add the sugar and evaporated milk, stirring until dissolved, and bring to a boil. Reduce the heat immediately to low and then cook for an additional 5 minutes, stirring occasionally. Remove the pan from heat and add the marshmallow fluff, peanut butter, and vanilla extract, stirring until completely smooth. Now fold in the peanuts, then pour over the bottom chocolate layer. Again, refrigerate until completely cool, about 30 minutes to 45 minutes.
4. Make the Caramel Layer: Combine the caramels and the heavy cream in a small saucepan over low heat. You might want to turn the burner up higher but don’t. Let them melt, stirring occasionally and until the mixture becomes smooth. Once completely melted, cook for an additional 4 minutes, stirring frequently. Pour the caramel over the nougat layer. Refrigerate until completely cool, about 30 minutes.
5. Make the Top Chocolate Layer: Melt together the chocolate chips and peanut butter in the microwave on 50% power until completely smooth and melted, stirring every 30 seconds. Pour over the caramel layer and, using a spatula, smooth into an even layer. Refrigerate until completely cool and set, 30 to 60 minutes.
6. Now using the using the parchment liner, remove the bars from the pan and cut into 32 pieces. You can store these in the refrigerator or at room temperature. Just keep them out of the sun and away from heat. I keep them in the fridge and then take them out an hour or two before you want to serve them.
They make a great gift and are always a hit!
Frugal Homemade Chocolate Pie

This is a great recipe that I love to make and it is from scratch which actually ends up being cheaper and tastes so much better than when you make it with a mix. Check it out! The original appeared on gourmet.com but mine is a little richer!
PIE CRUST DOUGH
- 1 1/4 cups all-purpose flour
- 3/4 stick cold unsalted butter, cut into 1/2-inch cubes
- 3 tablespoons cold vegetable shortening
- 1/4 teaspoon salt
- 3 to 4 tablespoons ice water
FOR FILLING
- 1/4 cup cornstarch
- 1/3 cup plus 2 tablespoons sugar, divided
- 3 1/2 tablespoons unsweetened cocoa powder
- 1/4 teaspoon salt
- 3 cups whole milk
- 4 oz bittersweet chocolate (not more than 60% cacao or higher), finely chopped
- 2 teaspoons pure vanilla extract
- 1 cup chilled heavy cream (do not use whipping cream)
MAKE DOUGH:
- Blend together flour, butter, shortening, and salt in a bowl with your fingertips or a pastry blender (or pulse in a food processor) just until mixture resembles coarse meal with some roughly pea-size butter lumps. Add the 2 Tbsp ice water evenly over mixture and gently stir with a fork (or pulse) until incorporated. This is vital for success later!
- Chill, wrapped in plastic wrap, until firm, at least 1 hour.
MAKE PIE SHELL:
- After chilling the dough, roll out dough on a lightly floured surface with a lightly floured rolling pin into an 11-inch round, then fit into a 9-inch pie plate. Trim edge, leaving a 1/2-inch overhang, then fold overhang under and crimp edge decoratively.
- Prick bottom and side of shell all over with a fork, then chill shell 30 minutes.
- While shell chills, preheat oven to 375°F with a baking sheet on middle rack.
- Line shell with foil and fill with pie weights or you can use uncooked beans.
- Bake on baking sheet until pastry is set and edge is pale golden, about 25 minutes to 30 minutes.
- Cool shell.
MAKE FILLING:
- Whisk together cornstarch, 1/3 cup sugar, cocoa powder, and salt in a 2-qt heavy saucepan, then gradually whisk in milk.
- Slowly bring to a boil over medium heat, whisking the whole time, once it reaches a boil let it simmer for 2 minutes (mixture will thicken).
- Remove from heat and whisk in chocolate and vanilla until smooth without any chunks. You will need to stir constantly.
- Pour filling into cooled shell and chill, its surface covered with wax paper (if you want to prevent a skin from forming) at least 2 hours-3
- Just before serving, beat cream with remaining 2 Tbsp sugar and 1tsp of vanilla. Spoon onto pie.
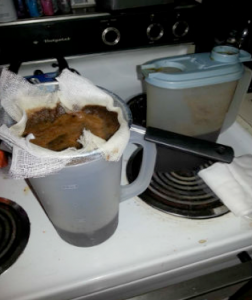
DIY Cold Brewed Coffee
Have you ever wondered how to make some delicious tasting coffee for cheaper than what you can get it at your local shop? Well, I have recently discovered Cold Brewed Coffee. I was skeptical at first, but after some research and giving it a try, I will never go back to hot drip coffee. It is *gasp* better than Dutch Bros or Starbucks! And so much cheaper! Here is what I do:
- Measure out 1/3 cup coffee grounds (coarse are the preferred grind, apparently, but I only have fine ground which has worked just fine for me) and 1 1/2 cups cold water.
- Add both to a container that you can cover (with a lid or saran wrap). I used a pitcher with a lid.
- Cover and let sit for 12-24 hours. I put it in the fridge, but I’ve also seen some who put it on the counter.
- After your time is up (the longer you let it set, the more caffeine it will have, and the richer it will be) use a second pitcher or container and strain it. I used a mesh strainer that fit just right on top of my pitcher and cheesecloth (but I bet a coffee filter would work fine too).
- Then enjoy!
I serve mine over ice and add flavored creamer. Or you can skip the ice and add milk and caramel syrup. I have a friend who blended it with vanilla ice cream and ice (which sounds delicious! If you want to add sugar, sugar won’t dissolve well since its cold, BUT I would recommend making a simple syrup which would blend nicely. (Dissolve sugar on the stove in boiling water and store in a squeeze bottle or other container) Then you can add it to your cold brewed coffee. You can also serve it hot; just nuke it in the microwave!
Why would someone want cold brewed vs. hot brewed coffee? It is richer, more caffeinated and has less acidity! Coffee usually can sometimes give people heartburn from the acid, but us coffee drinkers need our caffeine in the morning and this is the perfect fit. This stuff doesn’t give heartburn and it gives even more caffeine! Plus, it’s so delicious! You also don’t need a coffee pot on your counter! Just put that space taking machine away in the cupboard to save space for other things in your kitchen. Another bonus, it’s cheap! The straining does take some time, but make up a big batch and it will last you 2-3 days so you don’t have to strain every morning. You could also set it up in the morning then do your straining before you go to bed (which should give it at least 12 hours to set) so you just have to pour and enjoy in the morning!
I was a loyal Dutch Bros Coffee drinker. (If you are not familiar with Dutch Bros, you should move to the west coast, as it is fabulous!) This cold brewed coffee is so much better than any coffee shop I have ever tasted, and if you know me that is saying a lot!
By Tiffany, Fun 2B Frugal Contributor
Free Full Sized Sample Monkey Bars

Grab your 3 Free Boxes of Monkey Bars! All you have to do is fill out the form to get your free boxes.
This offer is not available is all states but if you can’t get it where you live, they will send you a money saving coupon!
Here is the Monkey Brains company website so you can learn more about the products!