
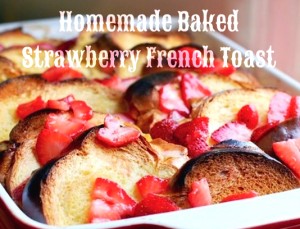
Recipe: Homemade Baked Strawberry French Toast
My kids love breakfast. French Toast is one of their favorites. They will eat slice after slice, covered in fruit and drizzled with a little real maple syrup. I make homemade Challah Bread or other sweet bread and then slice it up, freeze it and then it is all ready to go when the kids want me to make this. It is super simple.
Sometimes when I am up at the crack of dawn, I will fix this up and put it in the oven about 45 minutes before everyone’s set to wake up. The house smells divine…it’s sort of like Christmas Morning…you have that warm fuzzy, it’s going to be an amazing day sort of vibe.
If you don’t have strawberries, peaches, blueberries and other berries work well. You’ll love the recipe…it’s so easy!
Baked Strawberry French Toast
1 loaf day old challah, sliced into 3/4” thick slices
1 cup strawberries, hulled and sliced, plus more for garnish
4 eggs
3 1/2 cups milk
3 teaspoons sugar
1 teaspoon salt
2 teaspoons fresh grated nutmeg
zest of 1 lemon
1 tablespoon vanilla extract
Cinnamon for dusting over the top
Butter a 9 x 13” baking pan. Arrange the challah slices so that they are overlapping, tearing a few pieces in half if needed. Tuck the strawberries between the slices.
In a medium mixing bowl, lightly beat the eggs. Whisk in the milk, sugar, salt, nutmeg, zest, and vanilla. Then pour mixture over the challah.
Make sure that all of the slices are just about covered by the egg mixture–add more milk or rearrange the slices until they are. If refrigerating overnight, cover and chill. Otherwise, cover and refrigerate for a half hour, or longer if you have time.
Then preheat your oven to 350 degrees and take the baking dish out of the fridge. Once the oven is up to temperature, bake for 40 – 45 minutes, until the french toast is a light golden brown and has puffed up nicely.
Slice and serve immediately with maple syrup and sliced strawberries. Sprinkle lightly with cinnamon.
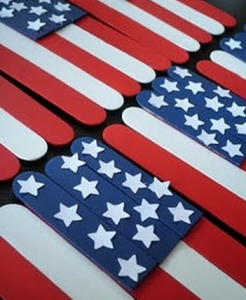
Patriotic Popsicle Sticks American Flag Kids Craft
I just love this craft because it is not only simple, but if you seal it, you can keep them for years to come!
You just need:
- Blue Paint
- White Paint
- Red Paint
- Popsicle Sticks
- Mod Podge (optional, for sealing)
- White Glue
- Cereal box or card board
- White star stickers
Once you have painted your popsicle sticks, you will need to have a small square of cardboard. I used an empty cardboard box for mine. Glue the dried, painted popsicle sticks directly to the cardboard so they have a nice foundation. Then layer on the second layer of painted popsicle sticks and secure with glue. Add the stars by painting them or using stickers.
Once dry, the flags can be glued onto another popsicle stick to “wave” or put into the ground as decorations. Another option is to tie them onto a string and make them into patriotic garland that you can use year after year!
This is a super cute holiday craft!
Check out this cute patriotic table cloth!
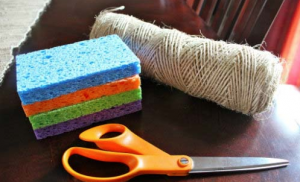
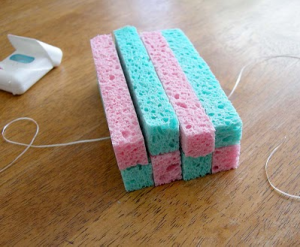
Sponge Balls Cheap Summer Fun
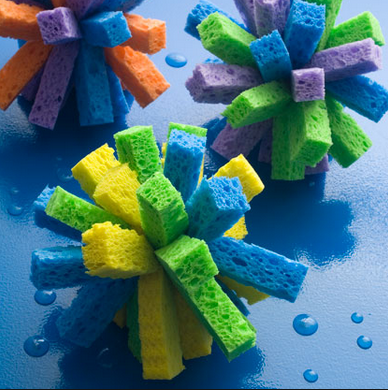
I always look for fun, easy and inexpensive things to do with the kids over the summer. These are perfect! You can grab the materials at your local Dollar Store or in the Dollar Bins at Target. I made a whole bucket of them for just a few bucks and they lasted for a while. The kids had a blast and we were able to stay cool during the sumer months.
All you need are sponges, some twine and a knife or scissors to cut the sponges with. Then you just tie the strips together. It’s so easy and best of all the kids can help!
Homemade Orange Cream Pops
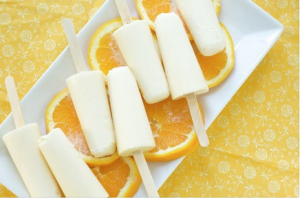
When I spied these yummy pops this morning on Pinterest, I almost fell over. I had found this recipe last year, tried it, loved it and then lost the link to the site! I was so excited to see it pop up today on one of the pages that I follow.
These are so good. I mean, you will want to eat a couple of them good! Make sure you let them freeze really well before you serve them! Thanks to OvenLove for the great post…and to whom ever out there in the Pinterest landscape for pinning it for the world to see! I made a slight change to the recipe but it is good either way!
Ingredients
- 1 cup orange juice (fresh or frozen. you could also use orange juice concentrate for a stronger orange flavor)
- 1 cup heavy cream (you could also substitute melted/very soft vanilla ice cream, Dreyer’s Slow churn works really well)
- 3 tablespoons honey, use a mild flavored honey sage or wild flower is best
- ¼ teaspoon orange extract
- ½ teaspoon vanilla extract (you can also use vanilla bean paste…it’s amazing!)
- 3/4 cup Mini Chocolate Chips (optional but amazing)
Instructions
- In a medium bowl, whisk all ingredients together. Then add the chips if you are using them.
- Pour mixture into popsicle molds. Let set for 30-60 minutes, then add popsicle sticks. Freeze for another 4-6 hours or until frozen.
- When you’re ready to serve, run some warm water along your popsicle mold to loosen the popsicles and serve immediately.
One of my friends melted the chocolate chips and then coated the insides of the popsicle molds with melted chocolate drizzles before pouring in the mixture. This also worked well!
Recipe: Kool-Aid Playdough
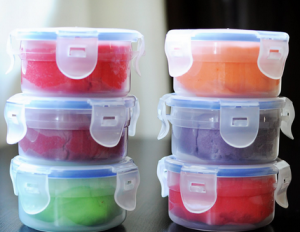

I love using my freebies and awesome deals to make fun low cost activities for the kids. This is a super fun thing that the kids can even help make! It is really easy and you can finish the whole process and be ready to play in about 7 minutes (okay 10 if you have the kids helping). Someone asked if you can make this with Country Time Lemonade and I can say, the last time I tried it, it did not produce as good of results as the Kool-Aide. Plus the KoolAide scent lasted a lot longer.
Ingredients
- 1 cup flour
- ¼ cup salt
- 1 packet Kool-Aid
- 1/2 cup Water
- 1 tbsp oil
Instructions
- Mix the flour, the salt, and the Kool-Aid together.
- Boil the water.
- Add the oil to the water.
- Pour some of the water into the dry ingredients and mix with a spoon. Keep adding water and work the dough until the color is uniform and feels like playdough.
- Be sure to keep stored in a resealable container in the refrigerator – it will last a very long time if you do, and can be used over and over again.