
Recipe: “Stained Glass” Sugar Cookies

This is the coolest and most creative use of hard candies I’ve seen since the DIY Christmas platters using peppermint candies I posted back in December. They’re beautiful, fun to look at, easy to make, and completely, 100% edible! Make them for your next potluck, for holidays, or just for fun. I can’t wait to hear how you like them!
Ingredients & Tools:
- Jolly Ranchers Hard Candies (Any hard candy will work, but cannot be sugar-free candy)
- Your favorite sugar cookie recipe (either premade or made from scratch, both work)
- 2 sizes of cookie cutters (these were hearts, but you can use your choice of 2 of the same shape, but different sizes)
- Baking sheet
- Wire racks
- Waxed paper
Directions:
- Roll out sugar cookie dough and cut out the cookies with a large cookie cutter. Use a spatula to move them to the baking sheet.
- Using the small cookie cutter, remove the centers of the large cookies that are on the baking sheet.
- Place 2 Jolly Ranchers (or other hard candy) of different colors inside the new empty center of the cookies. Choosing 2 different colors gives the stained glass look.
- Bake cookies with candy centers according to your cookie recipe’s instructions.
- Let the cookies cool on the baking sheet for 5 minutes to allow the candy center to harden before you then transfer them to wire racks to cool completely.
- Once fully cooled, you can move them onto a plate or into a storage container, but to prevent the hard candies from sticking together place waxed paper between layers of cookies. Enjoy!
Recipe: Lemon-Poppy Seed Zucchini Bread

For a refreshing change from regular zucchini bread, bake this lemon-poppy seed version from Southern Living Magazine. It’s perfect for summer and rated 5-stars!
Ingredients (Makes three 5- x 3-inch loaves):
- 1/2 cup butter, softened
- 1 1/3 cups sugar
- 3 large eggs
- 1 1/2 cups all-purpose flour
- 1/2 teaspoon salt
- 1/8 teaspoon baking soda
- 1/2 cup sour cream
- 1 cup shredded zucchini
- 1 tablespoon lemon zest
- 2 teaspoons poppy seeds
Directions:
- Preheat oven to 325°. Beat butter at medium speed with a heavy-duty electric stand mixer until creamy. Gradually add sugar, beating until light and fluffy. Add eggs, 1 at a time, beating just until blended after each egg is added.
- Stir together flour, salt, and baking soda. Add to butter mixture alternately with sour cream, beginning and ending with flour mixture. Beat at low speed just until blended after each addition. Stir in zucchini and next 2 ingredients. Spoon batter into 3 greased and floured 5×3-inch disposable aluminum foil loaf pans (about 1 1/3 cups batter per pan).
- Bake at 325° for 40 to 45 minutes or until a wooden pick inserted in center comes out clean. Cool in pans on wire racks 10 minutes; remove from pans to wire racks, and cool completely (about 30 minutes).
Picture via Living Rancho Deluxe.
Homemade 3-Ingredient Toilet Bowl Cleaner

A lot of people use bleach or other cleaners in their bathroom, but some feel that they want to control the ingredients they use around their families. By combining the fizzy power of baking soda and tea tree oil in this toilet bowl cleaner recipe from All You, you can clean your toilet naturally, in about 2 minutes, and spend almost nothing (only $.48 per cleaning)!
What You’ll Need:
- Measuring cup
- Toilet brush
- 1/2 cup baking soda
- 10 drops tea tree oil
- 1/2 cup distilled white vinegar
Directions:
- Pour baking soda directly into the toilet. Immediately add oil then vinegar—in that order exactly.
- Let water fizz for several minutes.
- Scrub bowl with brush until clean.
- Flush.
DIY Cereal Box Stencil Halloween Candy Tote Bags
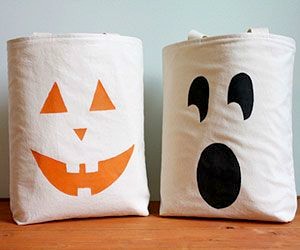
Update a classic fabric tote with easy-to-make stencils and sponge painting with this tutorial from Parents Magazine. Make these adorable tote bags and reuse them for years to come!
What You’ll Need:
- Fabric tote (get at any art supply store such as JoAnn’s or Michaels)
- Fabric paint
- Stencil brush or sponge
- Cereal box
- Crafts knife and cutting mat
- Masking tape
Directions:
- Cut one of the largest rectangles out from your cereal box.
- Either you or your child can sketch jack-o’-lantern shaped faces onto the box. Using a craft knife, an adult will now cut out the jack-o’-lantern shapes on a cutting mat.
- Next, tape your rectangle template with the faces cut out onto the fabric bag. Have your child dab on the paint using a stencil brush or sponge painting it as evenly colored as possible. You could also use the end of a sponge paint roller. NOTE: The trick to getting the paint on neatly is to hold the brush or sponge end perpendicular to the surface.
- Let dry fully for at least 12 hours (overnight would be best). To be safe, spray with waterproofing spray and then can be used in any Halloween weather for many years to come!
DIY Elastic Hair Ties
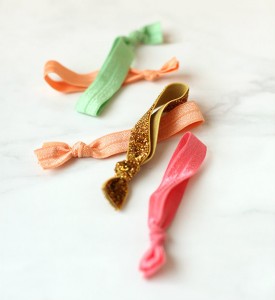
Elastic hair ties are such a popular hair accessory right now. They’re great because you can pull your hair back without leaving a huge dent, plus they’re really cute and you can wear them on your wrist. These little pieces of elastic can run you $5-$10 EACH depending on the brand and the color/decorations. You can make them yourself for a buck each or less!
What You’ll Need:
- 5/8″ foldover elastic (1 yard will make four hair ties)
- Scissors
- Measuring tape or ruler
Directions:
- Measure and cut a 9″ strip of elastic.
- Fold the strip of elastic in half.
- Tie the ends in a knot.
- Repeat.
Thanks to Minted for the tutorial! Be sure to check out their awesome website: http://www.minted.com/party-decorations