
Recipe: Pumpkin Sheet Cake With Cream Cheese Frosting
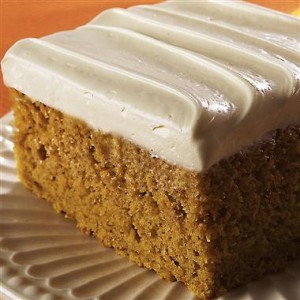
It’s that time of year again — PUMPKIN EVERYTHING!!! Instead of going to the store or bakery, you can make your own super easy pumpkin cake at home with a recipe from Eat at Home.
Ingredients & Directions for Pumpkin Cake:
- 16 oz can of pumpkin
- 2 cups of sugar
- 1 cup of vegetable oil
- 4 eggs, beaten
- 2 cups of flour
- 2 tsp of baking soda
- 2 tsp of cinnamon
- 1/4 tsp of nutmeg
- 1/2 tsp of salt
- Beat the pumpkin, sugar and oil in a medium mixing bowl. Then add eggs and mix well.
- Combine the dry ingredients and add to the pumpkin mixture, beating until well blended.
- Pour into a greased 10×15 inch baking pan.
- Bake for 25-35 minutes at 350 degrees.
- Cool the cake completely and then frost it with the cream cheese frosting.
Here’s what you’ll need for the frosting:
Ingredients & Directions For the Cream Cheese Frosting:
- 5 Tbs of butter, softened
- 3 oz of cream cheese, softened
- 1 tsp of vanilla
- 1-3/4 cups of powdered sugar
- 3-4 tsp of milk
- Optional: Chopped nuts or fall candies for the top
- Beat the butter and cream cheese together. Add the vanilla and blend till smooth.
- Gradually add the powdered sugar and mix well.
- Add the milk a bit at a time until you get it to a spreadable consistency.
- Spread gently and evenly over the cooled pumpkin cake.
- Optional: Add the nuts or candies to the top of the cake evenly or in a decorative fashion.
DIY Halloween “Preppy Pumpkin”
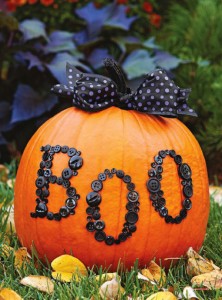
If you don’t want to carve your pumpkin or you have a fake pumpkin to decorate, here’s a great, simple, and very pretty idea that you can imitate and create your own version with different colors and words. Thanks to Pomp & Circumstance Events for the cute idea. All instructions below are for the pumpkin in the picture with all black decorations.
What You’ll Need:
- Pumpkin (real or fake in size of your choice)
- Ribbon (black or designed)
- Black paint (optional)
- Sharpie (black)
- Buttons (preferably black)
- Hot glue gun & extra sticks
- Scissors
Directions:
- Write a word/phrase across your pumpkin of your choice. Write in size and design you want the letters to look.
- Use hot glue gun to glue buttons on top of the word/phrase you wrote in marker. Try to get buttons as close together as possible.
- (Optional) – Paint the stem black, then wait for paint to dry fully.
- Cut ribbon the length of the pumpkin
- Tie ribbon in a bow around the stem and secure with hot glue.
Baked Mini Pumpkins
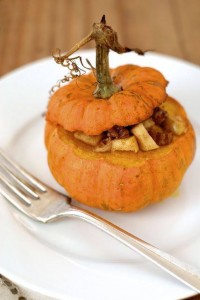
Many places across the country are getting storms for Halloween! The kids (and parents!) are going to be soaked and cold after Trick-or-Treating, so make this delicious recipe for Baked Mini Pumpkins to warm up! This recipe serves 4.
Ingredients:
- 4 mini pumpkins
- 1/4 teaspoon salt, divided
- 1 cup diced, unpeeled apple
- 3 tablespoons chopped pecans
- 2 tablespoons melted butter
- 2 tablespoons brown sugar
- 1 teaspoons vanilla extract
- 1/4 teaspoons ground cinnamon
- pinch nutmeg
- pinch ginger
Directions:
1. Preheat oven to 350`. Carefully cut off top 1/2-inch of pumpkins with a serrated knife. Scoop out seeds and membranes in pumpkins; discard. Sprinkle 1/8 teaspoon salt evenly among cavities of pumpkins.
2. Combine apple and remaining ingredients in a medium bowl; sprinkle with remaining 1/8 teaspoon salt. Stir well to combine. Fill pumpkin cavities with apple mixture. Replace tops of pumpkin on top of apple mixture.
3. Place pumpkins on a baking sheet lined with parchment paper. Bake at 350` for 55 minutes or until pumpkins are tender when pierced with a fork.
Creepy Finger Pizza
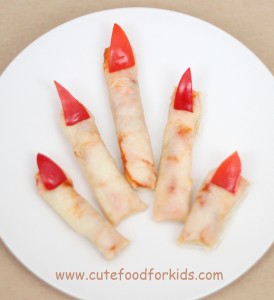
Here’s a fun dinner to make for Halloween! They’re very simple and surprisingly scary-looking finger pizza slices. You just need to bake a cheese pizza then cut into strips or sticks. You can use pepperoni, red pepper, green pepper, or olives as cut into nail shapes. Cut the pizza even smaller and make them into toes! Too fun and kids will love them.
Thanks to Cute Food For Kids for the idea!
DIY Glowing Fairies in a Jar
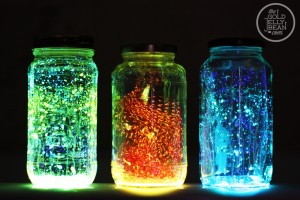
Most of us have seen the picture of fairies in a jar that went viral last year. We all found out that it was fake and photoshopped, much to many kids’ dismay. Here’s a REAL way to do it, no photoshop needed. BIG thanks to The Gold Jelly Bean for helping to make so many kids’ days brighter with this tutorial!!
What You’ll Need:
- Glass jar (cleaned one from spaghetti sauce or similar, or you can buy them at the dollar store)
- Glow sticks
- Rubber gloves
- Scissors
- Eye protector (like goggles or glasses)
- White tulle (optional, but looks better!)
Directions:
- Cut the tulle into a larger size than the jar and stick it inside. The tulle helps it look like the fairies are suspended in the jar, not just stuck on the sides of the glass.
- Put on rubber gloves and crack the glow stick to get the glow to activate, then stick the end of the glow stick into the jar and cut the top off. Be careful with this! There are glass and chemicals inside the stick, so be sure to not touch your eyes.
- Shake the stick all over the inside of the jar. This will take a while because it doesn’t just pour out, it may even get clogged. Use a new one, don’t try to get the glass out.
- After putting in the amount of glow liquid you want, put the cap on and shake. It will probably take 2-3 necklaces or 3-4 bracelet glow sticks to get the right amount.
- Turn out the lights and watch the amazement in your kids’ eyes!