
DIY $3 Wall Projector

Watching a huge movie on the side of a garage or inside on a large wall is so much fun. It’s just like going to a drive-in, but not everyone has hundreds of dollars to buy one. Here’s a genius hack that only costs $3 and uses your smartphone. If you want visuals on this tutorial click that link above.
What You’ll Need:
- Shoebox or small box
- Small magnifying glass
- Paperclip
- Smartphone Stanley knife
- Duct tape
- Optional: Black paint
Directions:
- Figure out the center of your box. Place your magnifying glass in the middle of the “height side” of the box (where the heel or toes would be) and trace around the lens.
- Use the knife to cut out the circle.
- Stick the magnifying glass into the hole from the inside and duct tape it in securely. Tape all the way around the edges of the circle, too. This will prevent light from getting in.
- To prevent even more light from getting inside the box, paint the inside black until completely opaque and allow to dry.
- Poke a hole at the back of the box and stick your phone charger through it.
- Using a pair of pliers, bend the paperclip into a stand for your phone, or use one you already have.
- The picture of your phone will appear upside down on the wall since it’s reflected through the magnifying glass. To fix it: For an iPhone go to Settings > General > Accessibility and turn on Assistive Touch. Then touch the floating orb thing that’s on your screen and select Device > Rotate Screen. For Android, Screen Rotation Control app or the Ultimate Rotation Control app will flip it correctly.
- Dim the lights,place your phone on its stand in the box, then move the phone back and forth in the box to find your focus point.
- Close the box, turn out the lights, and watch the movie on the large, flat area of your choice! SIMPLE!
Ridiculously Easy No Sew Boot Cuff Tutorial

These boot cuffs are all the rage right now. You can buy a pair for $13 or more, OR you can make them yourself without needing to sew at all! Take an old sweater you don’t wear anymore (or buy one at a thrift store), cut the sleeves off, and put them on over your pants/socks. If you want to make sure it doesn’t unravel, use fabric glue to cuff the part where you cut. That’s it! SO CHEAP AND SO EASY!
Recipe: Ultimate Grasshopper Cookies

Ingredients:
- Cookies:
- 1 Box Devil’s Food Cake mix
- 2 eggs
- 1/2 C. butter, melted
- 1 tsp. vanilla extract
- 3 Tbsp. brown sugar
- Mint Frosting:
- 2-3 C. powdered sugar
- 3/4 C. butter, softened
- 1 1/2 tsp. peppermint extract
- milk, if needed
- green food dye (for a more dark green if desired)
- Chocolate Glaze:
- 1 1/2 C. chocolate chips (I like to use chocolate “melts”)
- 4 Tbsp. butter
- Andes Mint Candies, roughly chopped
Directions:
1. Preheat oven to 350 degrees and line cookie sheets with parchment paper.
2. Combine cake mix, eggs, butter (let it cool a little, so it doesn’t cook the eggs), vanilla and sugar. That batter will be still.
3. Make dough balls a little large than a Tablespoon and place on cookie sheets to bake. (You make one to pat each dough ball down a little bit because cake mix cookies tend to bake up tall.)
4. Bake for 7-9 minutes and let cool on cooling racks.
5. Mint Frosting: Beat butter for 2 minutes. Add peppermint extract and slowly add it powdered sugar until you reach your desired consistency. Add 1-2 Tablespoons milk if it gets too thick. Add green dye for color if desired.
6. Chocolate Glaze: Melt chocolate chips and butter together in a microwave proof bowl. Zap for about 30 seconds, then stir, then microwave in 10 second increments and stir until smooth.
7. To assemble: Pipe on frosting, smooth over with a knife, spoon on your glaze and top with peppermint candies.
Thanks to Your Cup of Cake for the recipe!
Recipe: Homemade Thin Mints Cookies
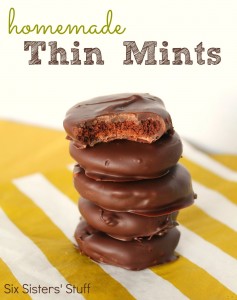
My oldest daughter is gluten intolerant, and I feel like she’s missing out on a huge part of her life by not being able to eat the amazing and coveted Girl Scouts THIN MINTS cookies! To aid in this missing part of her life, I decided to search out a homemade recipe that can be modified for her. The Thin Mints cookie recipe below by Six Sisters Stuff has normal flour in it, but it can be easily modified to include your favorite gluten-free flour.
Ingredients:
Cookies:
- 1 cup (2 sticks) unsalted butter, softened
- 1 cup powdered sugar
- 1 teaspoon vanilla extract
- 1 cup unsweetened cocoa powder
- 3/4 teaspoon salt
- 1 1/2 cups all-purpose flour
Mint Chocolate Coating:
- 2 cups semi-sweet chocolate chips
- 1 1/2 teaspoons peppermint extract
Directions:
- In a large mixing bowl, beat butter until light and fluffy. Add powdered sugar and mix until combined.
- Mix in vanilla, salt and cocoa. Add flour and mix until fully combined, and slightly crumbly. Chill dough in the refrigerator for 20 minutes.
- Preheat oven to 350 degrees. Remove dough from the fridge and knead a few times on a lightly floured surface to warm up.
- On a lightly floured surface, roll out dough to 1/8″ in thickness. Use a 1-1/2″ cookie cutter to cut circles of dough (or whatever shape or size you prefer).
- Place cut circles on a baking sheet lined with parchment paper. Bake cookies for 9-10 minutes, or until edges are set. Let cookies cool completely.
- After cookies are cool, place chocolate chips in a microwave-safe bowl. Microwave in 30-second increments and stir until melted. Stir in peppermint extract until smooth.
- Place cookies in the chocolate one at a time, using a fork to flip and lift cookie out of the chocolate. Transfer the chocolate covered cookie to a baking sheet lined with wax or parchment paper. Repeat with remaining cookies.
- Let chocolate harden before serving. You can place cookies in the refrigerator to set the chocolate faster.
Recipe: Vanilla Ice Cream Made With Real Snow!

Many of us in the United States are dealing with insane winter weather, including blizzards and more snow than we’ve seen in years. Take advantage of the piles of white stuff by making it into ice cream! Big hit with kids and adults and only takes 20 minutes. A big bonus – It’s Gluten-Free! Here’s how to do it:
Ingredients:
- 1 gallon CLEAN snow
- 2 cups of whole milk or half and half
- 1 cup sugar
- 2 tsp vanilla
Directions:
- Combine milk or half and half with the sugar and vanilla.
- Stir until the sugar is dissolved and add it to the fresh snow, then eat!
OR
- One 14 oz. can sweetened condensed milk
- 1 tsp vanilla
- 2 quarts fresh snow
- Combine together and eat!
Thanks to Polka Dot Poplars for the recipes and picture!