
Recycled Magazine Bows Tutorial
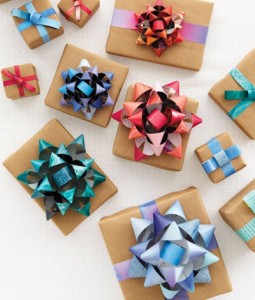
Instead of recycling your magazines, reuse them! Here is an easy tutorial for bows that you can use year round.
What You Need:
- 1 page of magazine per bow you plan on making
- Double-sided tape
Directions:
- Cut the page lengthwise into nine 3/4-inch wide strips of these heights: 3 at 11 inches long, 3 at 10 inches long, 2 at 9 inches long, and 1 at 3 1/2 inches long.
- Twist each strip to form loops at both ends and make a circle out of the smallest.
- Secure the ends with double-sided tape.
- Layer and stick, starting with the longest strips. End with the circle in the center.
Thanks to Whole Living for the tutorial. For pictures of each step, go here.
DIY Peppermint Candy Platter

Did you know you can take cheap peppermint candy (or ANY hard candy of any type) and make a platter? It’s amazing and SO EASY! Here’s what you do:
- Line a pizza pan with parchment paper.
- Open peppermint candies and arrange them in whichever pattern you’d like on the parchment paper.
- Bake at 350 for 13-17 minutes.
- Pull it off the pizza pan after 2-3 minutes & put it flat on the counter to cool (still on the parchment paper).
- Allow to cool fully and pull off the paper. VOILA! Plate made from candy.
Recipe: Natural, Organic Dog Treats

My dogs love their treats, but they’re so filled with “junk”! Instead of giving them boxed treats for their Christmas present (or every day!), try this yummy treat recipe. It’s so natural that we humans can eat it!
Ingredients:
- 2 cups of 100% organic whole wheat flour (or wheat germ, spelt, rolled oats, or a mixture of these)
- Fido’s K9 Yogurt Icing (add water and food coloring according to directions on package)
- 2x 4oz jars of pureed organic baby food (beef, blueberry, sweet potato, chicken, etc. Whatever sounds good)
IMPORTANT NOTE: Make sure there are no onions/onion powder in it. Also, avoid any with artificial preservatives (should be easy, most are just pureed veggies and water).
Directions:
- Preheat oven to 350°.
- Mix together to form a stiff dough. Add extra flour or water as needed.
- On a lightly floured surface, roll out dough to about a 1/4 inch thick. Use cookie cutters to cut into fun shapes or a pizza cutter to make cubes.
- Line a cookie sheet with parchment paper, place treats about 1/2 inch apart. Bake for 20 – 25 minutes. Allow to cool completely then add Fido’s K9 Yogurt Icing and allow to harden before storing in a paper bag (storing in an air-tight container will make them soft, but they’re still edible).
Consider adding grated carrots or sweet potatoes, a little bit of parsley (which helps with bad breath), blueberries, or some peanut butter to your next batch!
Thank you to Curbly for the treat recipe
Recipe: Peppermint Candy Cane Fudge

Is anything better than creamy peppermint fudge topped with marshmallows, white chocolate, and candy canes?! NOPE!
Ingredients:
- 1 bag (12oz) white chocolate morsels
- 1 bag (10oz) Andes Peppermint Crunch baking chips
- 7 oz jar marshmallow creme
- 1/2 cup of unsalted butter
- 3/4 cup of heavy cream
- 2 cups of granulated sugar
- pinch of salt
- 1 pkg (16oz) vanilla Candiquik, melted
- 3 cup Mini Peppermint Marshmallows
- 5 peppermint candy canes, broken
Directions:
- In a mixing bowl, add white chocolate morsels, Andes baking chips and marshmallow creme, then set aside.
- Prepare a 13×9 baking dish by lining it with parchment paper, then set aside.
- In medium saucepan, heat butter, heavy cream, sugar and salt over medium high heat. Bring to a boil and continue stirring. Boil for 5 minutes, stirring constantly. Remove from heat.
- Pour over morsels and marshmallow creme, beating with a whisk until smooth and melted. (I highly suggest using an electric stand or handheld mixer- this fudge is thick)! Pour fudge into prepared baking dish.
- Melt vanilla candiquik according to package directions. then allow to cool slightly (about a couple minutes). Fold in the mini marshmallows and pour over top of fudge. Immediately sprinkle with the broken candy canes. Allow fudge to set for about 2-3 hours. Cut into bites and enjoy!
Thanks to Shugary Sweets for the yummy recipe!
Recipe: Santa Strawberries
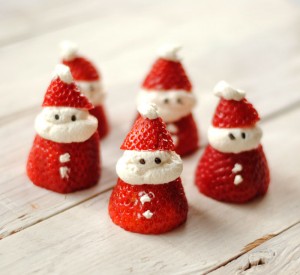
Make these adorable Santa Strawberries along with these Grinch Kabobs for a more nutritious snack for the kids this year!
Ingredients:
- 1 dozen strawberries
- 1 cup whipped cream
- chocolate sprinkles
Directions:
- Slice the leafy end off each strawberry with a pairing knife so they stand up evenly. Then slice the tip off to make a little hat (isn’t it perfectly shaped for that?).
- With a spoon or icing tip, put 1-2 tsp of whipped cream on top of the strawberry base. Put on the hat and put a tiny tab of whipped cream at the very tip to look like the puff on the top of Santa’s hat.
- Put 2 chocolate sprinkles in the “face” to look like Santa’s eyes.
- Add 2 tiny tabs of whipped cream down the front of the strawberry base with a toothpick to look like buttons.
- If not eating immediately, cover and put in the fridge to keep from melting.
Thanks to Leanne bakes for the recipe!