
Recipe: Edible Hollow Easter Eggs
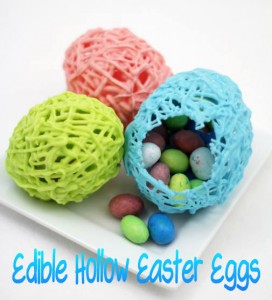
Last year I did the craft that looks just like these that uses yarn and glue on balloons. They came out really cute, but after Easter, they were pretty mangled, so we tossed them. Instead, I think we may make this edible version from She Knows – and they are SUPER CUTE!
Ingredients:
- Chocolate candy melts in pastel colors (1 cup solid candy melts = about 3 hollow eggs)
- Piping bags, frosting, or zip-closed sandwich bags
- Small latex balloons (DO NOT USE WATER BALLOONS!)
- Non-stick cooking spray
- Straws or wooden skewers
- Clothespins
- Plastic cups or glasses (larger than the inflated balloons)
- Optional: Small Easter candies like jelly beans
Directions:
- Inflate balloons to about the size of a real egg or slightly larger. (Do not use water balloons. The latex is too thin and will burst when you pour hot melted chocolate on it.)
- Put one cup of chocolate candy melts in a bowl and microwave for 30 seconds at a time, stirring after each heating until completely melted. Pour the melted chocolate into a piping bag or zip-closed bag. Cut off the tip or corner or the bag.
- Work over the sink or a newspaper and hold the inflated balloons by the tied end. Grab each balloon by the end, and lightly spray your balloons with non-stick cooking spray, then drizzle melted chocolate across the bottom of the balloon in all directions. Turn balloon over and continue drizzling chocolate over the top and sides.
- With a clothespin, clip the balloon to a straw or wooden skewer and balance inside of a cup or glass to dry.
- Once the chocolate is completely dry and cooled, deflate your balloon by clipping the tied end with scissors to release the air. Let it release the air on its own, don’t rush it.
- Very carefully and slowly pull the balloon out of the hole that is left where the tie of the balloon was.
- You can either leave the eggs as they are, or you can break some of the candy and use it as a basket. Fill with little candies for extra fun!
DIY Rainbow Jello Egg Jigglers
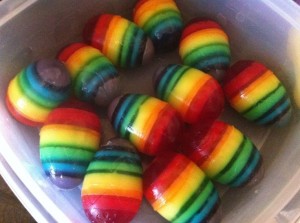
Seriously, are these not the CUTEST things you’ve ever seen? They are extremely pretty and a bit tedious to make. You can always just make 1 or 2 colors of Jello instead and work yourself up to these full spectrum rainbows. Here’s what you do:
Using Jell-O Jigglers Egg Molds, coat the mold with a generous amount of cooking spray. Use a syringe to add each layer of color at a time, then chill for 10-15 minutes between each layer before moving to the next. Store them in the fridge in an egg-carton, making “hard boiled eggs” that were filled with Jell-O instead. :)
DIY Shaving Cream Dyed Marble Easter Eggs
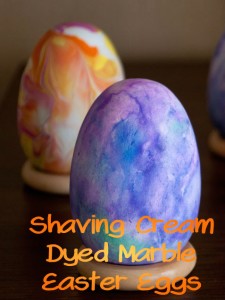
I haven’t dyed eggs with my kids yet. It seems like Easter flew up on us this year. If we don’t make Kool-Eggs, then I think we are going to do Marbleized Dyed Easter Eggs. Inexpensive, fast, pretty, and very pretty!
NOTE: Dyeing your eggs with shaving cream is for decoration ONLY since egg shells are permeable and you shouldn’t eat shaving cream. If you like to eat your eggs after dyeing them, you can do marbleizing with whipped cream instead of shaving cream. Whipped cream is a lot more expensive than buying cheap shaving cream at a dollar store, so this is an optional switch.
What You’ll Need:
- Completely cooled hard boiled eggs
- Food coloring drops in different colors
- Medium to large baking sheet, baking pan, or other container with sides
- Cheap shaving cream (or whipped cream in an aerosol can)
- Spoon
- Toothpicks
- Paper towel
- Plastic gloves, sandwich baggies or plastic wrap
- Paper plate or cheap plastic storage container (that you don’t care will get dyed)
Instructions:
- Spray shaving (or whipped) cream and spread out evenly on a cookie sheet (or other container) with a spoon.
- Dribble food coloring across the surface. Neon food coloring makes cooler looking eggs.
- Use toothpicks to swirl the colors around in the shaving cream. Do it totally randomly and be sure to pick up and restart lines into the cream. This will make the best designs.
- Take a dried, cooled hard boiled egg, and roll it around in the cream. You can use plastic gloves, or use sandwich baggies or plastic wrap as gloves to help keep the dye consistent, keep finger prints off the eggs, and will protect your fingers from dye.
- Add more cream and/or dye as needed throughout the dyeing process.
- Sit colored eggs to the side on a paper plate or in a plastic storage container and allow them to dry for at least 2 hours, but best is overnight to 24 hours. DO NOT WIPE THEM OFF, leave them in the cream and dye. If you used whipped cream, be sure to put them in the refrigerator while they sit.
- After allowing the eggs to sit, wipe the cream and dye off with paper towel. You can store in the original egg carton in the fridge or set them out as decorations.
Thanks to TotSchool for the picture!
Recipe: Fluffy Bunny Butt Cookies
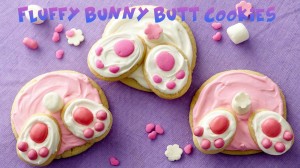
Spring is here and Easter has some of the cutest and brightest holiday treats. These adorable Fluffy Bunny Butt Cookies recipe from the Pillsbury website are easy and will be a big hit at any parties or family parties this weekend. Have your kids help decorate these lil cuties!
Ingredients:
- 1 roll (16.5 oz) Pillsbury™ refrigerated sugar cookies
- 1/3 cup all-purpose flour
- 1 container (12 oz) fluffy white whipped ready-to-spread frosting
- 22 miniature marshmallows
- Spring colored candy sprinkles
- Optional: Pink gel food color
Directions:
- Heat oven to 350°F. In a large bowl, knead cookie dough and flour with hands until well mixed.
- Reshape dough into 9 x 1 1/2-inch log. Wrap dough in plastic wrap and refrigerate for 30 minutes.
- Remove plastic wrap. Cut cookie dough into 33 slices. Cut 11 of these slices into 4 equal wedges. Shape each of the wedges into ovals for bunny feet. Place cookie dough slices and bunny feet on ungreased cookie sheet.
- Bake cookies for 8 to 12 minutes or until edges are light golden brown. Let cool for 1 minute, then remove from cookie sheets and place on cooling racks. Cool completely (10-15 minutes).
- While cooling, using a medium microwavable bowl, stir frosting and 1 to 3 drops pink food color until well blended and you find the color pink you like best. Microwave frosting uncovered on High for 10 to 15 seconds or until soft, but not translucent.
- To make bunny butt, frost 1 whole cookie slice and 2 bunny feet with frosting. Place bunny feet on bottom of cookie as shown in photo. Place 1 marshmallow in center of each cookie for tail.
- Decorate bunny paws with candy sprinkles. Repeat with remaining cookie slices and bunny feet. These can be baked and frozen for up to 2 months before thawed and eaten.
FUN EXTRA: If you want to decorate more, you can add ears to your bunny by placing candy-coated almonds or jelly beans at top of each cookie.
DIY Bunny Ears Headband
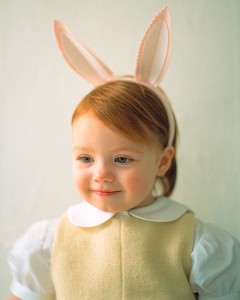
I love dressing my little ones up for Easter with cute little outfits and bunny ears. I always get them the cheap ones from Target, but I think this year I’m going to do this easy craft from Martha Stewart Baby. You can make them for kids or adults as long as you have the right size headbands!
What You’ll Need:
- Child-size headband (or adult for larger head)
- 8-by-16-inch piece of pink felt
- 6-by-6-inch piece of white felt scissors
- Pinking or scalloped shears (optional)
- Hot-glue gun
- Hot-glue sticks
- Bunny ears template
Directions:
- Measure the width and length of the top of the headband, add 1/2 inch to all sides, and cut a strip of pink felt to cover.
- Glue the felt strip onto the top of the headband, wrapping the extra material around the headband’s edges.
- Measure the underside of the headband, and cut a strip of pink felt to fit.
- Glue the strip to the underside, creating a backing that covers the edges of the top felt.
- Print out our bunny-ears template, and cut out both shapes.
- Trace the outer-ear shape onto pink felt twice, and cut along scalloped edge (or cut out with pinking or scalloped shears).
- Trace the inner-ear shape onto white felt twice, and cut out with regular scissors.
- Glue each pair of ears together with hot glue, and let dry.
- Crease each ear vertically down the middle, and press.
- Fold up the bottom flaps on either side of the notch, and attach to headband with hot glue, pulling notches closed so ears are slightly bent. Hold until glue sets.