
Recipe: Crock Pot Veggie Pizza

Skip pickup or delivery pizza tonight. Make your own pizza at home using your crock pot. It’s true! The recipe by Simple Nourished Living (who has a huge variety of slow cooker meals, by the way) is healthy and couldn’t be easier!
Ingredients:
- 1 refrigerated pizza dough (11 to 14 ounces)
- 1 cup pizza sauce or marinara sauce
- 1 cup shredded part-skim mozzarella cheese
- Any sliced veggies of your choice!
Directions:
- Spray your slow cooker with cooking spray to make sure the pizza crust doesn’t stick.
- Place the dough into the crock pot and spread out onto the sides about an inch using your fingers.
- Evenly spread sauce onto the crust then put 3/4 cup of the cheese over the sauce.
- Toss in the vegetables and spread them out all over the pizza, covering it. Then put the rest of the 1/4 cup of cheese on top of the veggies.
- Cover your crock pot and cook on HIGH for 2 to 2-1/2 hours or until the crust begins to brown around the edges.
- Uncover and move lid quickly to make sure the condensation doesn’t drip onto your pizza.
- Turn off crock pot and let stand for 15 minutes.
- Using 2 spatulas, you should be able to lift it right out of the cooker.
- Cut into 8 pizza slices and enjoy!
Recipe: Oreo and Peanut Butter Brownie Cakes

These VERY yummy little brownie cupcakes are so easy to make, you may never go back to regular brownies or cupcakes again. Make them for your next party or potluck! Big thanks to FoodSnots on Instructables for the recipe! Ingredients:
- 1 box brownie mix, 8×8 inch size
- 24 Oreo Cookies
- 1/2 cup creamy peanut butter
Directions:
- Preheat oven to 350 degrees and line a 12 muffin cup baker with paper liners and spray generously with cooking spray.
- Prepare brownie mix according to package directions, then spoon just enough brownie batter to cover the bottom of the liners completely.
- Spread a teaspoon of peanut butter over 2 Oreo cookies, stack them, then place them in the lined cups. Repeat.
- Spoon 2 tablespoons of brownie batter over each of the stacked Oreos and let it run down the sides of the cookies.
- Bake cookies and brownies for about 14 minutes or until brownies are cooked through (don’t be fooled by the “shiny” top, they may already be baked fully).
- Let cool completely then serve or store in an airtight container with a slice of bread to keep them moist for up to a week.
Recipe: Easy Ragu Stuffed Peppers
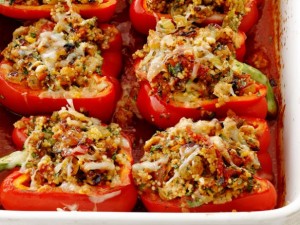
It’s nearly fall and we’re all looking for warm, simple, and filling meals. Here’s an easy recipe for Ragu Stuffed Peppers from The Food Channel that can also be great to be in a tailgating potluck!
Ingredients:
- 4 bell peppers (red, yellow or a mix), halved lengthwise with seeds removed
- 2 tablespoons extra-virgin olive oil
- Kosher salt
- About 3 cups Ragu sauce (or equivalent)
- 1/2 cup couscous
- 3/4 cup golden raisins
- 3/4 cup grated asiago or fontina cheese
- 4 teaspoons red wine vinegar
- 1/2 cup chopped fresh parsley
- 2 tablespoons tomato paste
Directions:
- Preheat the oven to 450*F. Toss the bell pepper halves with 1 tablespoon olive oil and 1/2 teaspoon salt in a large microwave-safe bowl.
- Cover bowl and microwave them until the peppers soften, 10 to 12 minutes.
- Mix the Ragu (or other sauce), couscous, raisins, 1/2 cup cheese, 3 teaspoons vinegar, the parsley and 1/4 teaspoon salt in a bowl.
- Whisk the remaining 1 tablespoon olive oil and 1 teaspoon vinegar, the tomato paste and 3/4 cup water in the bottom of a large nonreactive baking dish.
- Carefully move the peppers, cut-side up, to the baking dish & fill with the couscous mixture. Sprinkle with the remaining 1/4 cup cheese.
- Cover the dish with foil and bake until the peppers are tender and the filling is hot, or about 20 minutes.
- Transfer the stuffed peppers to plates and drizzle with the cooking liquid from the dish.
Recipe: Turtle Cheesecake Dip

I had another idea for today’s blog, then I found THIS recipe. I am going to hurry and share it and hopefully forget about it or else I can see this being my “hiding in a corner so my kids can’t see me eating it” meal tonight. This delicious dip is from Bubbly Nature Creations. She has a ton of yummy recipes over there. Just a fair warning in case you are trying to watch what you eat. :)
Ingredients:
- 8 oz. cream cheese softened
- ⅓ cup powdered sugar
- 1 box of cheesecake pudding mix
- 2 cups whipped cream
- ¼ cup and 1 Tbsp. chopped and toasted pecans
- ¼ cup of Hershey’s™ Spreads in Chocolate
- ¼ cup caramel sauce
Directions:
- Place cream cheese, powdered sugar, pudding, and whipped cream in a mixing bowl and mix on high until light and fluffy.
- Add ¼ cup of the toasted pecans and mix on low speed until evenly incorporated.
- Place the mixture into your serving bowl and drizzle the Hershey’s Spreads and caramel sauce on top.
- Sprinkle on the remainder of the toasted pecans on top and serve immediately or place in refrigerator up to 2 days.
Recipe: Gluten-Free Coconut Banana Bread
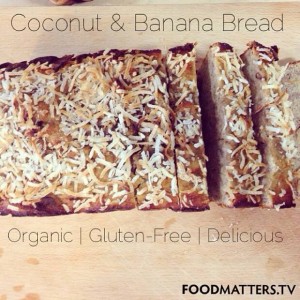
From the book, Food Matters, comes a delicious and wheat and gluten-free bread that can be used for breakfast and dessert! In my opinion, you could toast it and also use it as french toast!
Ingredients:
- 2 bananas; at least 1 heaped cup of chopped banana
- 1/4 cup coconut oil, melted
- 4 organic free-range eggs
- 4 fresh dates, pitted and chopped
- 1 tbsp pure maple syrup or raw honey
- 3/4 cup coconut flour
- 1/2 tsp aluminium-free baking powder
- 1/4 tsp unrefined sea salt
- 1/2 tsp cinnamon powder
Directions:
- Preheat oven to 350F. Mash bananas with the chopped dates.
- In another bowl, whisk the eggs until fluffy and then combine with the mash. Stir through the oil and maple syrup or honey. Add the dry ingredients and combine well.
- Transfer the batter to a loaf pan, greased and lined. The mixture will be quite thick; flatten and smooth with a spatula.
- Bake 35-40 minutes. Ready when a knife comes out clean and the edges are browned. Eat while still warm, or allow to cool completely on a wire rack before storing in an airtight container in the fridge.
Note:
It’s best to use overripe bananas in banana bread! Coconut flourit doesn’t have the glycemic load of grain flours, has no gluten or anti-nutrients, but it also doesn’t yield the ‘fluffiness’ of regular glutenous flours, so it might take some getting used to. This recipe gives the best bread texture without using wheat.