
Recipe: Easy & Pretty Sparkling Cranberry Brie Bites
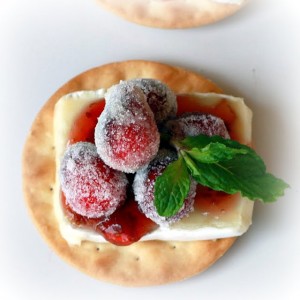
Want a festive-looking and delicious appetizer that is easy and will impress all your guests? Try this recipe for Sparkling Cranberry Brie Bites!
Ingredients & Directions for 16 Sugared Cranberries:
- 2 cups of fresh cranberries, washed thoroughly
- 1 cup of good maple syrup
- 1 cup of granulated sugar
- Place washed cranberries in a medium bowl.
- Heat syrup in a small sauce pan just until warm.
- Pour warm syrup over cranberries. Make sure it is NOT hot, or the cranberries may pop.
- Cool, cover, and let soak in the refrigerator overnight.
- The next day, drain cranberries in a colander.
- Place sugar in a large bowl or baking dish. Add cranberries in 2 batches and roll around until lightly coated in sugar. Place on a baking sheet until dry (about 1 hour).
Rest of the Ingredients & Directions:
- 16 crackers (of your choice)
- 8 oz Brie cheese
- Cranberry chutney or cranberry relish
- Fresh mint for garnish.
Assemble crackers with one slice of brie, a light layer of cranberry chutney, and 4 or 5 sugared cranberries. Garnish with fresh mint sprigs. Now they’re ready to be served!
Thanks to Yummy Mummy Kitchen for the recipe!
Recipe: Santa Strawberries
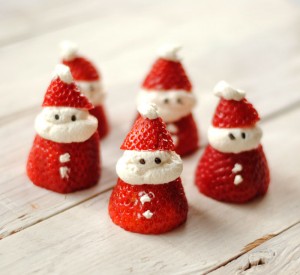
Make these adorable Santa Strawberries along with these Grinch Kabobs for a more nutritious snack for the kids this year!
Ingredients:
- 1 dozen strawberries
- 1 cup whipped cream
- chocolate sprinkles
Directions:
- Slice the leafy end off each strawberry with a pairing knife so they stand up evenly. Then slice the tip off to make a little hat (isn’t it perfectly shaped for that?).
- With a spoon or icing tip, put 1-2 tsp of whipped cream on top of the strawberry base. Put on the hat and put a tiny tab of whipped cream at the very tip to look like the puff on the top of Santa’s hat.
- Put 2 chocolate sprinkles in the “face” to look like Santa’s eyes.
- Add 2 tiny tabs of whipped cream down the front of the strawberry base with a toothpick to look like buttons.
- If not eating immediately, cover and put in the fridge to keep from melting.
Thanks to Leanne bakes for the recipe!
Recipe: Grinch Kabobs for Kids
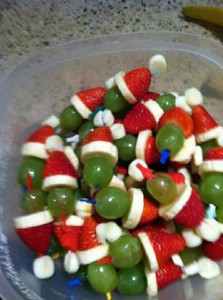
Looking for a healthy treat for Christmas time instead of the usual cookies and other sweets? Here’s an adorable idea using fruit to make Grinch kabobs!
What You’ll Need:
- Toothpicks
- Green grapes
- Sliced bananas
- Sliced strawberry ends (to look like Santa’s hat)
- Mini marshmallows
Directions:
- Stack toothpicks starting with a green grape (stem side through the toothpick), then a slice of a banana, the slice of a strawberry (pointy end last), then a mini marshmallow (looks like the puffy end of Santa’s hat).
- Eat fairly soon after or the bananas will go bad quickly!
DIY: Peanut Butter Pumpkins
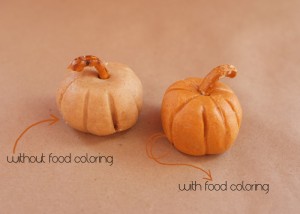
Making these adorable and easy peanut butter pumpkins are a delicious way to celebrate Fall. They would be great to have as a part of Thanksgiving appetizers or meals, too! I can only imagine that they could be made using almond or other nut butters, too! Kids could get into the fun to make them.
What You’ll Need (makes 12 pumpkins):
• ¾ cup creamy peanut butter
• ¼ cup unsalted butter, softened
• ½ teaspoon vanilla extract
• orange (or red & yellow to mix) food coloring (optional)
• 2 cups confectioners’ sugar
• wax paper
• toothpicks
• mini pretzels
Directions:
- Mix together the butter and peanut butter
- Add the vanilla and 2-3 drops of orange or a drop of red and drop of yellow (they look great without the coloring, too, if you opt for that. See picture above.)
- Slowly add in the confectioners’ sugar with a spatula until the consistency is fairly thick
- Divide the mixture into 12 balls (or less if you want larger pumpkins), then roll them into balls and place on wax paper
- Make creases and shape the pumpkins with a toothpick
- Break apart the mini pretzels and put a piece into each pumpkin as its “stem”
Eat the pumpkins alone or with pretzels! Thanks to Fossil Blog for the idea :)
Halloween Fruit Skewers
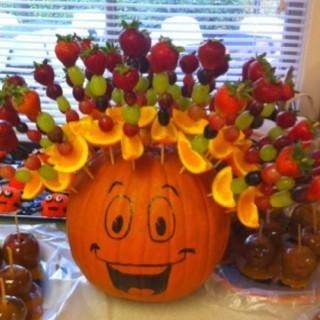
Having a Fun Halloween Party and want to serve up something delicious and healthy? Check out this easy, fun way to display fruit on the food table. All you have to do is make fruit skewers of your choice, poke them into a pumpkin and put a face on it! Voila! Cute, Fun Way to decorate and serve delicious snacks at your festive Halloween Party this year!