
Handmade Icicle Ornaments
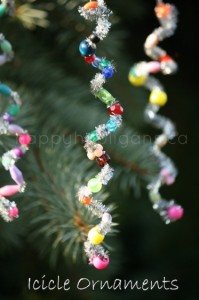
Looking for a simple, fun, and festive art project for the kids? These Icicle Ornaments are exactly that, plus it is a cute and sparkly sensory experience for the kids while decorating the tree!
What You’ll Need:
- metallic pipe cleaners
- pony beads
- thread (for hanging on the tree)
- pencil
Directions:
- To help keep the beads from falling off the end, bend the tip of each of the pipe cleaners around a few times.
- Put fun colored beads along the pipe cleaner. Leave space between them so you can see the sparkly metallic.
- Loop the pipe cleaner around the pencil to give it the spiral look.
- Loop a thread through the top bead and tie in a knot. Hang on the tree. It’s that simple!
Thanks to Happy Hooligans for the adorable idea!
DIY Glitter Branches

Such a cute and CHEAP idea for decorating for the holidays. Add a few decorative vases to put them in, and you’ve got a super sparkly room!
What You’ll Need:
- Tree branches (Make sure they’re thoroughly dry!)
- White glue
- Spray glue
- Paint brush
- Cookie sheet
- Silver spray paint
- Silver glitter
- Clear Colorfill accents (You can get them at Michael’s or other craft stores) OR Epsom Salt
Directions:
- Find a branch outside that you want in the size and shape that you like. Choose a few if you want to do more than one. Cut down to shape using lopping shears.
- Spray with silver spray paint and allow it to dry.
- Spray the spray glue over the whole branch making sure to get all the nooks and crannies.
- Sprinkle the silver glitter over the branch. Hold branch over a cookie sheet to help catch the glitter when it falls. If you do it outside, then it will be cleaner (choose a non-windy day).
- Glue in random places to make it look icy, then sprinkle with clear Colorfull accents over the glue (or Epsom salt). This creates an “icy build up”.
Thanks to Momtastic for the tutorial!
Handmade Puzzle Wreath Picture Frame
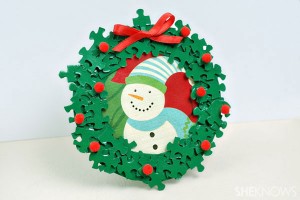
If you’re like us, we have tons of random puzzle pieces all over. If you’re not, then go to your thrift shop and get a 100 piece puzzle for $1 or so. Either way, this is a fun and thrifty gift that the kids can make, and when you fill with a picture, the grandparents will love for years to come!
What You’ll Need:
- paint brush
- glue
- red pom poms
- red ribbon
- a small round picture frame (craft store or dollar store)
- puzzle pieces
- green craft paint
- newspaper or something else to protect your work surface
Directions:
- Lay your puzzle pieces on the protected surface, and paint one side of each of your puzzle pieces green. Allow the puzzle pieces to dry. Double check that they are painted well enough to be opaque. If not, then put on another layer and let dry.
- Start gluing the puzzle pieces around the frame. Glue a single layer and allow that layer to dry completely before adding more layers. Add more puzzle pieces until the frame is completely covered and green.
- Once the puzzle pieces are dry, glue red pom poms around the frame, then tie a bow with red ribbon and glue it to the top of the frame to make it look like a wreath. Put chosen picture inside and gift. That’s it!
DIY Nail Polish Ornaments
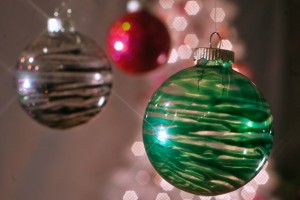
If you love the newest and prettiest nail polish colors AND love Christmas ornaments, this is an easy and gorgeous project you’ll love!
What You’ll Need:
- Multiple nail polishes (you’ll use at least 1/10 to 1/4 of a bottle of each)
- Cotton swabs
- Clear glass Christmas ornaments (from a craft store)
Directions:
- Be sure that you choose nail polishes with metallic textures that are not too thin or too thick. (The ones that work the best and are the prettiest are glitter polishes with a thin and opaque finish)
- Take the metal cap off the ornament and poor in a little bit of the nail polish. Start with a small amount and you can always add more if needed.
- Swirl the nail polish around the ornament with a cotton swab, twirling the ornament as you go. You’ll want to bend the swab for the hard to reach places.
- When you’ve coated the ornament with the swab, swirl the ornament around and around to make sure you get all of the extra polish drips and help it dry.
- Once you’re sure the polish is dry, place the metal cap back on, and it’s ready to hang on your tree!
Thanks to Beautylish for the awesome directions!
DIY: Handmade Turkey Hair Bows
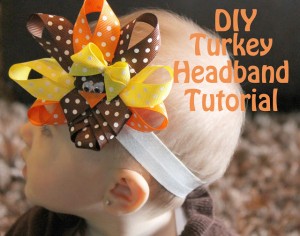
I don’t know about you, but I know I’ve spent $10 or more for Thanksgiving turkey bows. I found a really simple tutorial so that you don’t have to pay more than a buck or two for them. You could even make them as gifts or sell them if you’d like!
What You’ll Need:
- Glue gun
- Scissors
- Brown 5/8 ribbon ( patterned or plain)
- Yellow 5/8 ribbon
- Orange 5/8 ribbon
- Wiggly Eyes
- Headband or hair clip
- Optional: thin wire
Directions:
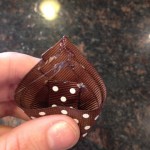
- Cut strip of brown ribbon about 2″ long, fold in half and glue the two ends together on the inside part (the part not showing) and press. Set it aside.
- Cut 3 more brown ribbons: 4″, 4.5″, and 5″. Put glue on the end of each ribbon on the side you want showing to create a curve like an oval or O, press and set aside all 3.
- Grab the first 2″ ribbon you folded inside the smallest loop bow that you created in #2 and glue inside.
- Glue each ribbon inside of the next size larger (see picture below). This creates the turkey’s body.
- Cut another 3″ ribbon and glue as in #2 to make the turkey’s head. Glue to the body.
- Now time for the feathers: Cut 3 orange, 2 yellow, and 2 brown into 5.5″ strips. Loop around and cross at the very ends. Glue the ends together on the side that you want showing (they look like the feathers in the first picture).
- Glue the feathers like this and in this order: orange in the middle of the body behind the head/body, then two brown to each side, 2 yellows beside/below the brown, then 2 orange very last.
- Use a small triangle of orange ribbon as the beak and glue to the head. Then attach two wiggly eyes above it.
- You can stop there or create a “girly” turkey and make a bow for the turkey bow. Cut a strip of yellow ribbon and make it into an X. Wrap the wire in the middle to create a “bow”. Glue to the side of the turkey’s head.
- Glue to headband or hair clip. DONE! It is easier to create than it is to type out the directions. :)
Thank you to Mommy’s Little Sunshine for the great tutorial!