
DIY: Peanut Butter Pumpkins
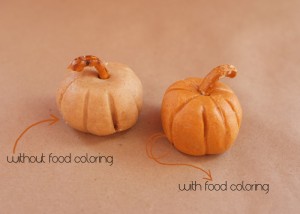
Making these adorable and easy peanut butter pumpkins are a delicious way to celebrate Fall. They would be great to have as a part of Thanksgiving appetizers or meals, too! I can only imagine that they could be made using almond or other nut butters, too! Kids could get into the fun to make them.
What You’ll Need (makes 12 pumpkins):
• ¾ cup creamy peanut butter
• ¼ cup unsalted butter, softened
• ½ teaspoon vanilla extract
• orange (or red & yellow to mix) food coloring (optional)
• 2 cups confectioners’ sugar
• wax paper
• toothpicks
• mini pretzels
Directions:
- Mix together the butter and peanut butter
- Add the vanilla and 2-3 drops of orange or a drop of red and drop of yellow (they look great without the coloring, too, if you opt for that. See picture above.)
- Slowly add in the confectioners’ sugar with a spatula until the consistency is fairly thick
- Divide the mixture into 12 balls (or less if you want larger pumpkins), then roll them into balls and place on wax paper
- Make creases and shape the pumpkins with a toothpick
- Break apart the mini pretzels and put a piece into each pumpkin as its “stem”
Eat the pumpkins alone or with pretzels! Thanks to Fossil Blog for the idea :)
DIY Napkin Rings
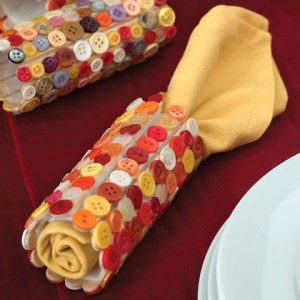
These napkin rings are so cute, easy and CHEAP! You can make them for any or all holidays you choose from things you can buy at the dollar store or craft store.
What You’ll Need:
- Felt
- Popsicle sticks
- Tacky glue
- Small paintbrush
- Buttons in assorted colors (you can buy them by the bag in many craft stores)
Directions:
- For each napkin ring, cut a 4- by 5 1/2-inch piece of felt.
- Starting at one short end of the rectangle, glue on 12 Popsicle sticks (it’s less messy if you use a small paintbrush to spread the glue), lining them up side by side. You should end up with a margin of uncovered felt at the end.
- Once the glue dries, form a ring by gluing the overlapped felt together.
- Now comes the fun part: glue on rows of buttons, Let the glue dry completely.
- When it’s time to use the rings, roll up napkins. Insert one in each ring.
Thanks to Spoonful for the easy craft!
DIY Sparkling Leaves Garland
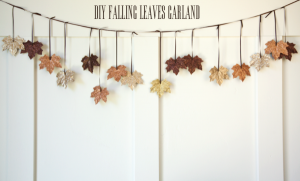
Spruce up your home and get ready for Autumn with this easy to make sparkling falling leaves garland. This is a great craft to do with kids and get them excited for Fall!
What You’ll Need:
- Artificial leaves (can be purchased at Dollar Tree or craft stores)
- Paintbrush
- Elmers Glue
- Glitter (natural colors)
- Hole punch
- Ribbon
Directions:
- Pick out about 10-12 leaves that are the nicest (or however long you want to make your garland).
- Doing 1 leaf at a time, paint a medium layer of glue over a leaf and cover with glitter. Let dry and shake off remaining glitter.
- Use hole punch and punch a hole in the middle at the bottom of each leaf so they will hang upside down.
- Tie a long string of ribbon in each leaf and hang from a long string of ribbon to create the garland. Hang and enjoy!
Thank you to Boxwood Clippings for the great decorating idea!
Kids Recycled Cardboard & Yarn Snowflakes
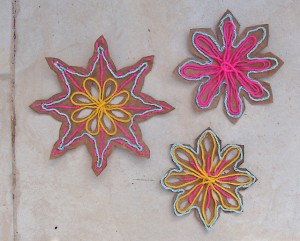
It’s snowing already in many places in the country. Besides green and red decorations, what else can we create and have our kids be involved? Snowflakes of course! This is a simple and adorable craft made from recycled cardboard and any yarn you’d like.
Materials:
- cereal box (or any thin) paperboard or cardboard
- yarn in any colors
- kid’s washable glue (like Elmer’s)
- glitter, rhinestones, beads, buttons, etc.
Directions:
- Make snowflakes from squares of paper and trace them onto the cardboard.
- Cut out the shapes (for small details use tiny manicure scissors or a craft knife. It’s not necessary, but it’s a pretty addition).
- Squeeze glue onto the cardboard snowflake in the pattern you’d like to place and decorate with your yarn.
- Carefully lay the yarn down into the glue and add additional glue and details as desired.
- Decorate however you’d like! Go nuts!
- Hang and enjoy!
Thanks to Creative Jewish Mom for the idea!
Leftover Halloween Candy Bark
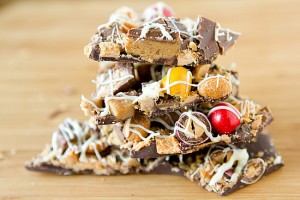
Yesterday was Halloween, so how much candy do you and the kids have leftover? If you’re like many homes across the country, you have so much left over that you think you’ll never get through it all. Instead of tossing it, make this yummy Halloween Candy Bark!
INGREDIENTS:
1 pound bittersweet chocolate, chopped
3 Butterfinger candy bars (or 8 fun-size bars), cut into 1-inch pieces
3 Heath candy bars (or 6 fun-size bars), cut into ¾-inch pieces
8 Reese’s peanut butter cups, each cut into 8 wedges
¼ cup honey roasted peanuts
3 ounces white chocolate, chopped
½ cup Peanut M&M’s (Halloween colors!) or Pretzel M&M’s or Reese’s Pieces
DIRECTIONS:
1. Line a baking sheet with parchment paper; set aside.
2. Place the chopped bittersweet chocolate in a medium bowl and microwave at 50% power in 30-second increments, stirring after each, until completely melted and smooth. Pour the chocolate onto the prepared baking sheet and, using an offset spatula, spread into a thin layer (about ¼-inch thick – a 12×10-inch rectangle). Sprinkle the melted chocolate with the chopped Butterfingers, Heath bars, peanut butter cups and honey roasted peanuts, making sure all pieces touch melted chocolate (so they adhere). Lightly press to make sure the candy adheres to the melted chocolate. Refrigerate for 30 minutes.
3. Melt the white chocolate using the same method as the bittersweet chocolate (in a microwave in intervals) until completely smooth. Using a spoon, drizzle the white chocolate over the chilled bark in a zigzag pattern. Scatter the M&M’s (or Reese’s Pieces) over the white chocolate drizzle, and again press to make sure the candy adheres to the melted white chocolate. Chill again until the white chocolate is set, about 30 minutes.
4. Cut/break the bark into irregular pieces and serve. Store leftovers in the refrigerator.
5. ENJOY!
Thanks to BrownEyedBaker for the recipe!