
Recipe: Copycat P.F. Chang’s Mongolian Beef
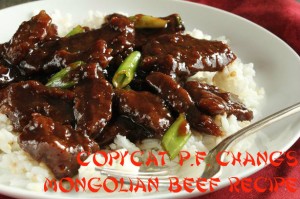
P.F. Chang’s is known for their delicious take on Chinese food, and their Mongolian Beef is one of their most popular dishes. Serve the Mongolian Beef with steamed broccoli and rice for a complete meal! Note: If you use a gluten-free soy sauce in this recipe, then the beef, served with broccoli and rice will be all gluten-free!
Ingredients (Serves 2):
- 2 teaspoons vegetable oil
- 1/2 teaspoon ginger, minced
- 1 tablespoon garlic, chopped
- 1/2 cup soy sauce
- 1/2 cup water
- 3/4 cup dark brown sugar
- vegetable oil for frying (about 1 cup)
- 1 lb flank steak
- 1/4 cup cornstarch
- 2 large green onions, sliced on the diagonal into one-inch lengths
Directions:
- Make the sauce by heating 2 tsp of vegetable oil in a medium saucepan over med/low heat. Don’t let the oil get too hot.
- Add ginger and garlic to the pan and quickly add the soy sauce and water before the garlic scorches.
- Dissolve the brown sugar in the sauce, then raise the heat to about medium and boil the sauce for 2-3 minutes or until the sauce thickens. Once thickened, remove sauce from heat.
- Slice the flank steak against the grain into 1/4″ thick bite-size slices (Note:Tilt the blade of your knife at about a forty five degree angle to the top of the steak so that you get wider cuts).
- Dip the steak pieces into the cornstarch to apply a very thin dusting to both sides of each piece of beef, then place on a plate. Let the beef sit for about 10 minutes so that the cornstarch sticks.
- As the beef sits, heat up 1 cup of oil in a wok (Using a skillet is fine as long as the beef will be mostly covered with oil).
- Heat the oil over medium heat until it’s hot, but not smoking.
- Add the beef to the oil and sauté for just two minutes, or until the beef just begins to darken on the edges. (Note: The meat will be heated once again after this step, so it doesn’t need to be cooked thoroughly.)
- Stir the meat around a little so that it cooks evenly.
- After a couple minutes, use a large slotted spoon to take the meat out and onto paper towels, then pour the oil out of the wok or skillet.
- Put the pan back over the heat, dump the meat back into it and simmer for one minute.
- Add the sauce, cook for one minute while stirring, then add all the green onions.
- Cook for one more minute, then remove the beef and onions with tongs or a slotted spoon to a serving plate or bowl and eave the excess sauce behind in the pan.
DIY Nail Polish Remover Jar
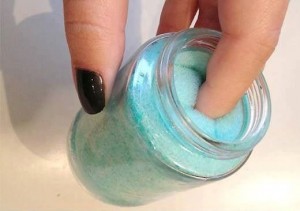
Why pay $5 or more for the nail polish remover/sponge all-in-one jar? Make it at home over and over again. It’s got to be way cleaner to replace it more often and it will be a small percentage of buying them over and over again at the store! It actually does save on nail polish remover: The amount that you pour in the jar and use 5x (or more) is the same as what you would use to remove ONE manicure! It’s also great to remove glitter polish.
What You’ll Need:
- Nail polish remover (acetone is stronger, but it dries your nails and cuticles out, so be careful)
- Dish sponge (plain, without the scrubber side)
- Baby food jar (or something small and can be resealed)
Directions:
- Cut your sponge in half directly down the center lengthwise.
- Roll your two sections of sponge together (like a cake roll).
- Push your sponge snugly into your baby food jar and fill it with nail polish remover a little bit at a time until it fills up the sponge.
- Tightly screw the lid on every time so it doesn’t dry out!
When you’re ready to use it, just stick your finger into one of the crevices, let sit for about 10-15 seconds, then rub your nail up and down a few times. For glitter, let your nail sit in the sponge for 60 seconds and check to see if it is easy to remove. If not, let it sit for another minute. Repeat.
Thanks to Bella Shoot for the pictures and tutorial!
DIY $3 Dessert & Treat Stand
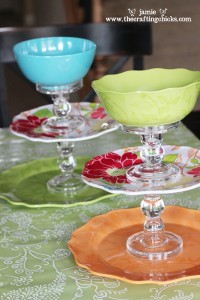
I showed you how to make one for Christmas, but why only have these simple and cheap stands for the holidays? You can make them and use them year round! Get everything either at the Dollar Store or Thrift Store, mix and match the colors, designs, and materials for your tastes and make them shabby chic! You can make them with a plate or a bowl on top, or you can make it with only 2 tiers instead of three. Thanks to Jamie at The Crafting Chicks for the cute and easy tutorial!
What You’ll Need:
- 2 candlestick holders
- A larger plate or platter
- A slightly smaller plate
- A bowl or another platter
- Permanent craft glue (like E6000 or Gorilla Glue)
Directions:
- Use a liberal amount of glue on the bottom of the first candlestick holder and stick it to the bottom plate in the middle (either measure to find exact middle or eyeball).
- Glue top of candlestick holder and place the littler plate on it.
- Repeat with the next candlestick holder and bowl.
- Allow to dry for an hour before use, then enjoy!
HAND WASH AND DRY ONLY!
Recipe: Copycat Cracker Barrel Hash Brown Casserole
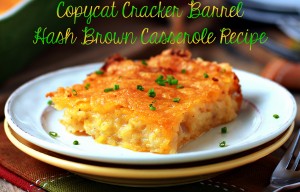
One of my favorite restaurants for breakfast is Cracker Barrel, and I mean beyond the giant checker board and triangle peg games. Cracker Barrel’s Hash Brown Casserole is my favorite restaurant breakfast food. I am thrilled to have found how to make it at home!
- 8 Tbsp cold unsalted butter, divided
- 4 Tbsp all-purpose flour, divided
- ¼ tsp poultry seasoning
- ¼ tsp onion powder
- ¼ tsp garlic powder
- ½ tsp kosher salt
- ½ tsp fresh ground black pepper
- ½ cup milk
- 1 cup low-sodium chicken broth, divided
- ½ cup chopped onions
- 1 (26 oz) package frozen shredded hash browns
- 1 (8 oz) package shredded colby cheese
Note: You can cut the casserole in half and bake into two 8×8″ casserole dishes, then freeze or save for later use.
- Preheat oven to 375 °F.
- In medium saucepan over medium heat, melt 2 tablespoons butter. Once butter is melted, add 2 tablespoons of flour and all listed seasonings. Whisk to create a paste. Add milk, whisking as you pour. Whisk until completely combined.
- In a quart sized mason jar combine 2 tablespoons flour and chicken broth. Seal tightly and shake the living tar out of your mixture. You will create a smooth flour mixture for thickening your sauce called a slurry.
- Slowly pour slurry into mixture, whisking constantly. Bring to a boil and cook for 2 minutes, stirring constantly.
- Pour soup into 9×13 casserole dish. Add remaining 6 tablespoons butter and onions. Stir until butter is melted. This will also start to cool your soup. Add cheese and frozen hash browns. Mix well with a spoon.
- Bake 25 minutes or until the top is golden brown. Note: You can add more cheese to the top of the casserole in the last 10 minutes of baking if desired.
- Let cool slightly, cut into 12 pieces, serve and enjoy!
Recipe: Crock Pot Veggie Pizza

Skip pickup or delivery pizza tonight. Make your own pizza at home using your crock pot. It’s true! The recipe by Simple Nourished Living (who has a huge variety of slow cooker meals, by the way) is healthy and couldn’t be easier!
Ingredients:
- 1 refrigerated pizza dough (11 to 14 ounces)
- 1 cup pizza sauce or marinara sauce
- 1 cup shredded part-skim mozzarella cheese
- Any sliced veggies of your choice!
Directions:
- Spray your slow cooker with cooking spray to make sure the pizza crust doesn’t stick.
- Place the dough into the crock pot and spread out onto the sides about an inch using your fingers.
- Evenly spread sauce onto the crust then put 3/4 cup of the cheese over the sauce.
- Toss in the vegetables and spread them out all over the pizza, covering it. Then put the rest of the 1/4 cup of cheese on top of the veggies.
- Cover your crock pot and cook on HIGH for 2 to 2-1/2 hours or until the crust begins to brown around the edges.
- Uncover and move lid quickly to make sure the condensation doesn’t drip onto your pizza.
- Turn off crock pot and let stand for 15 minutes.
- Using 2 spatulas, you should be able to lift it right out of the cooker.
- Cut into 8 pizza slices and enjoy!